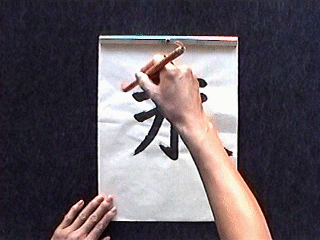
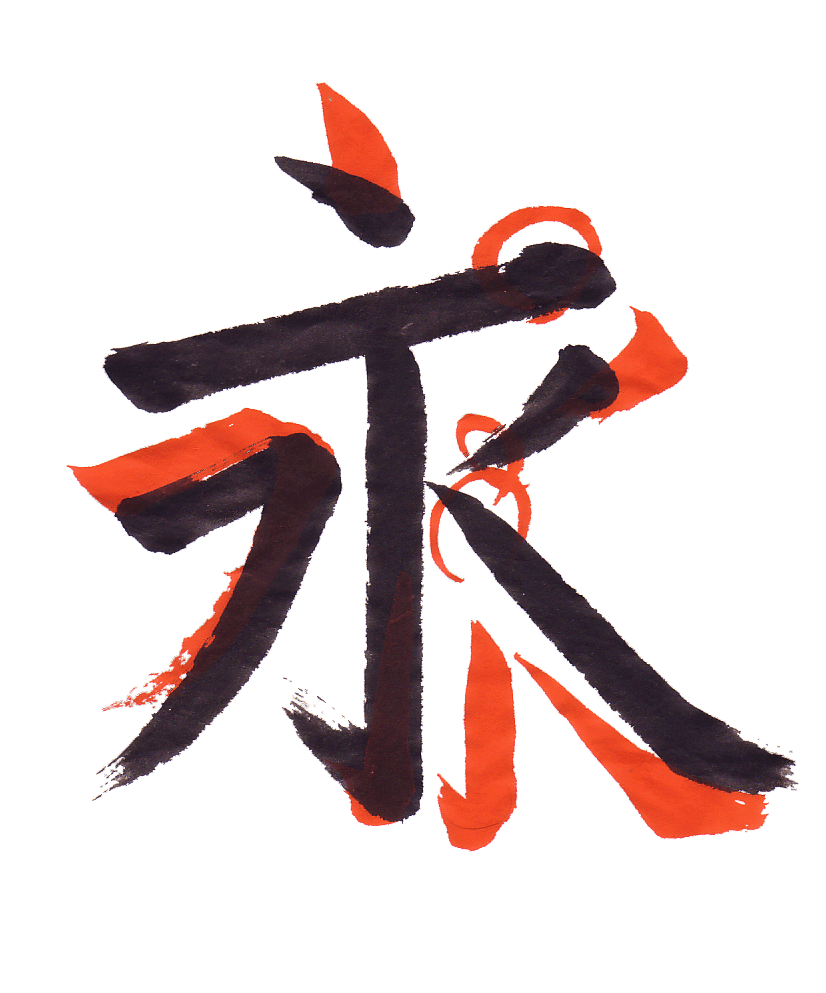
Lesson 3 - Ei (Eternity) 永
In this lesson we are going to discuss the eight basic strokes. We will come back to these time and again and it is important to practice and master these strokes. Mastering these strokes is the basis for writing many kanji.
The eight basic strokes are almost always introduced in what is called Eiji Happou which translates to "Ei (Eternity) Character's Eight Basic Strokes." This is because the character for Eternity has each of the fundamental strokes.
We will first look at the final results and the strokes to make the character. Next we will go into detail discussing each of the eight strokes individually. Finally we will return to the ei character and discuss important points in a video and with frame by frame analysis.
Lesson 3 Vocabulary
| Romaji | Hiragana | Japanese | English |
| ei | えい | 永 | Eternity |
| eijihappou | えいじはっぽう | 永字八法 | Ei (Eternity) Eight Basic Strokes |
| hane | はね | 撥ね | Flick Stroke |
| harai | はらい | 払い | Pullout Stroke |
| hidaribarai | ひだりばらい | 左払い | Left Pullout Stroke |
| hidarihane | ひだりはね | 左撥ね | Left Flick Stroke |
| migibarai | みぎばらい | 右払い | Right Pullout Stroke |
| migihane | みぎはね | 右撥ね | Right Flick Stroke |
| tatega | たてが | 縦画 | Vertical Stroke |
| tategahane | たてがはね | 縦画撥ね | Vertical Stroke with Flick |
| ten | てん | 点 | Dot Stroke |
| yokoga | よこが | 横画 | Horizontal Line |
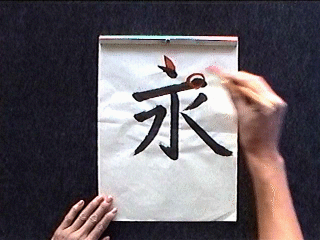
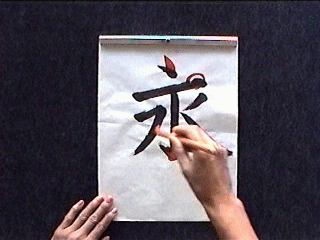
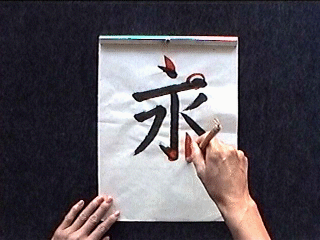
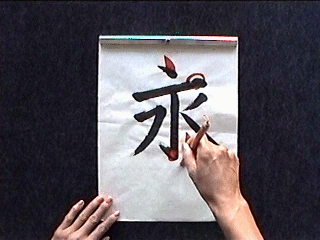
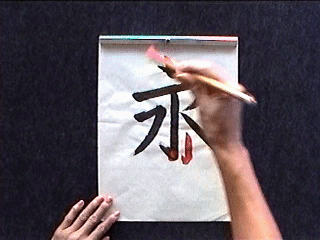
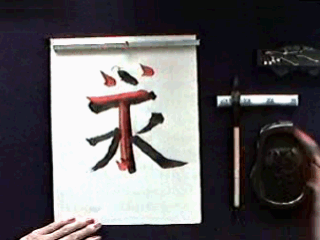
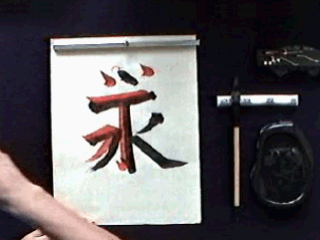
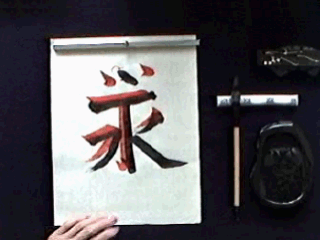
| Ei (Eternity) 永 Samples | |
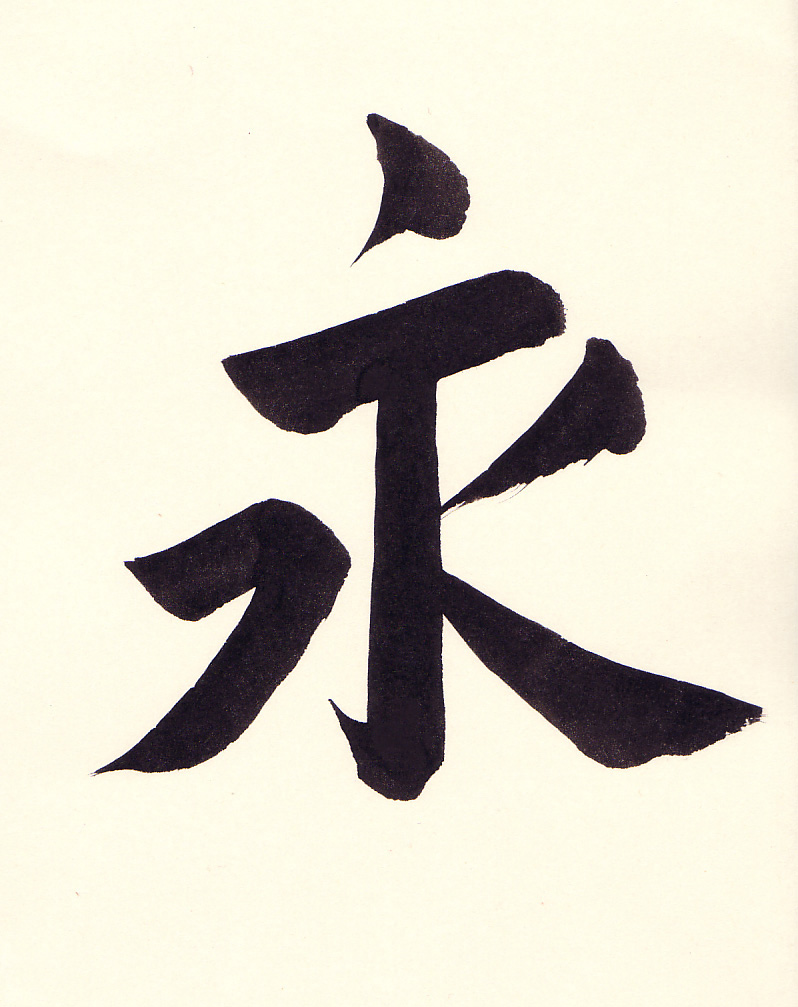 |
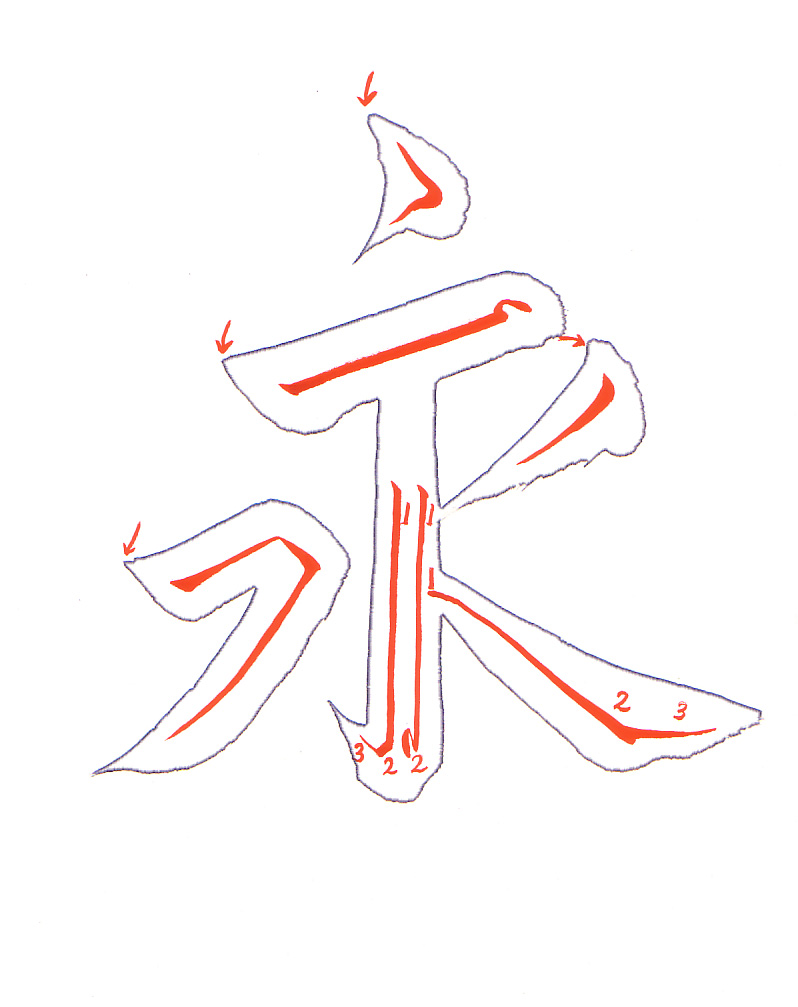 |
| Ei (Eternity) 永 | Ei (Eternity) 永 Annotated |
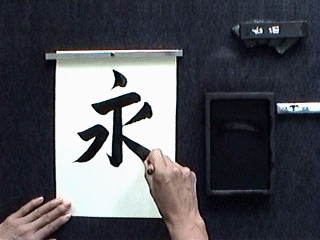
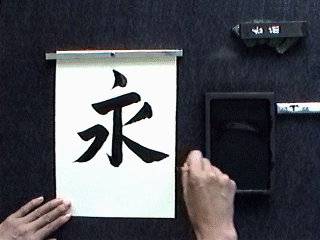
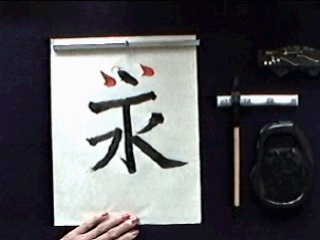
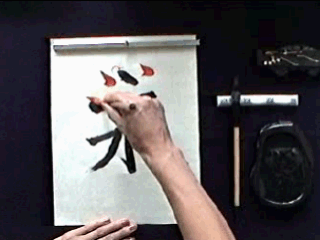
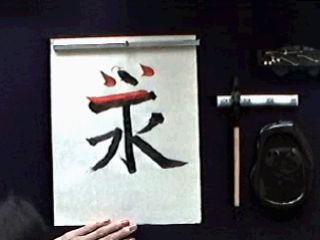
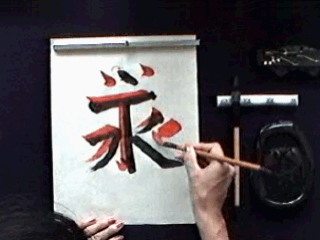
Ei (Eternity) 永 Sensei Video
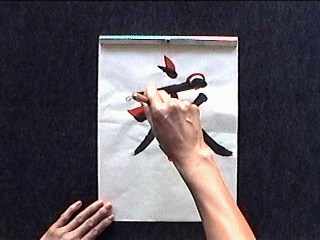
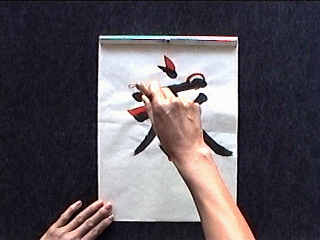
| Happou (Eight Strokes) 八法 Samples | |
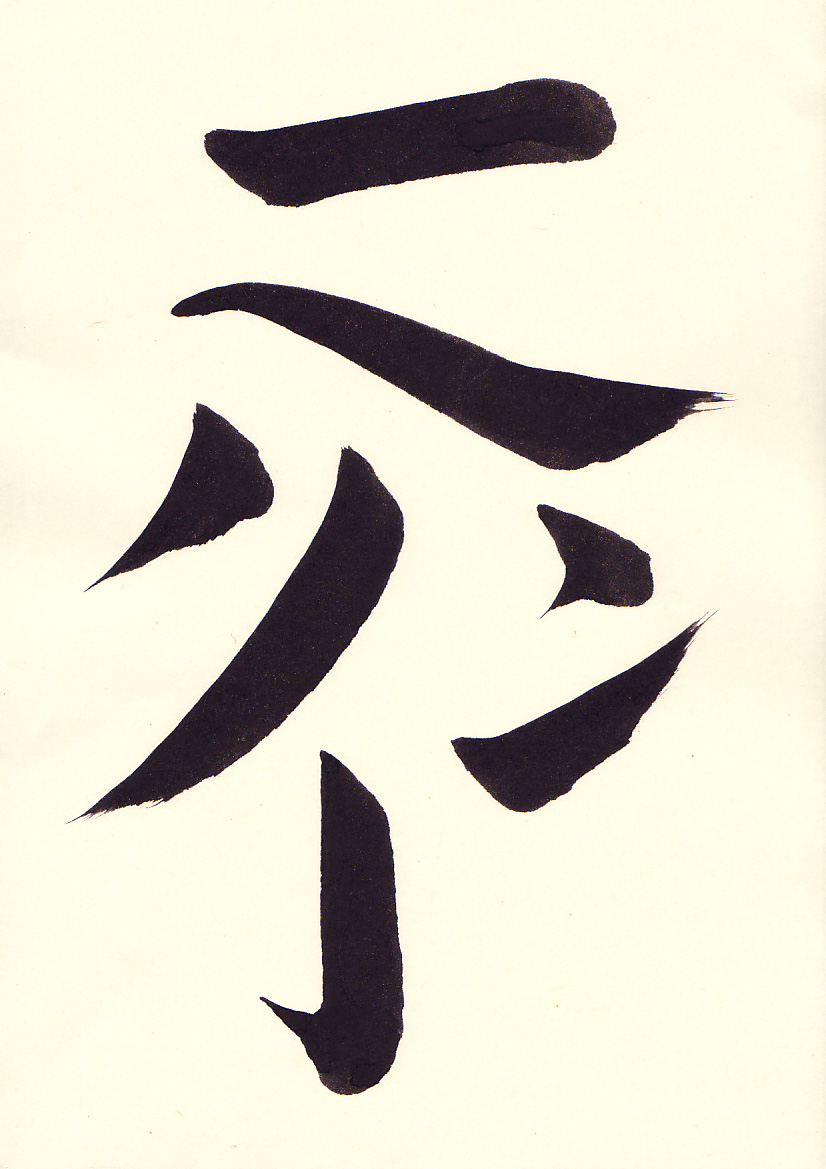 |
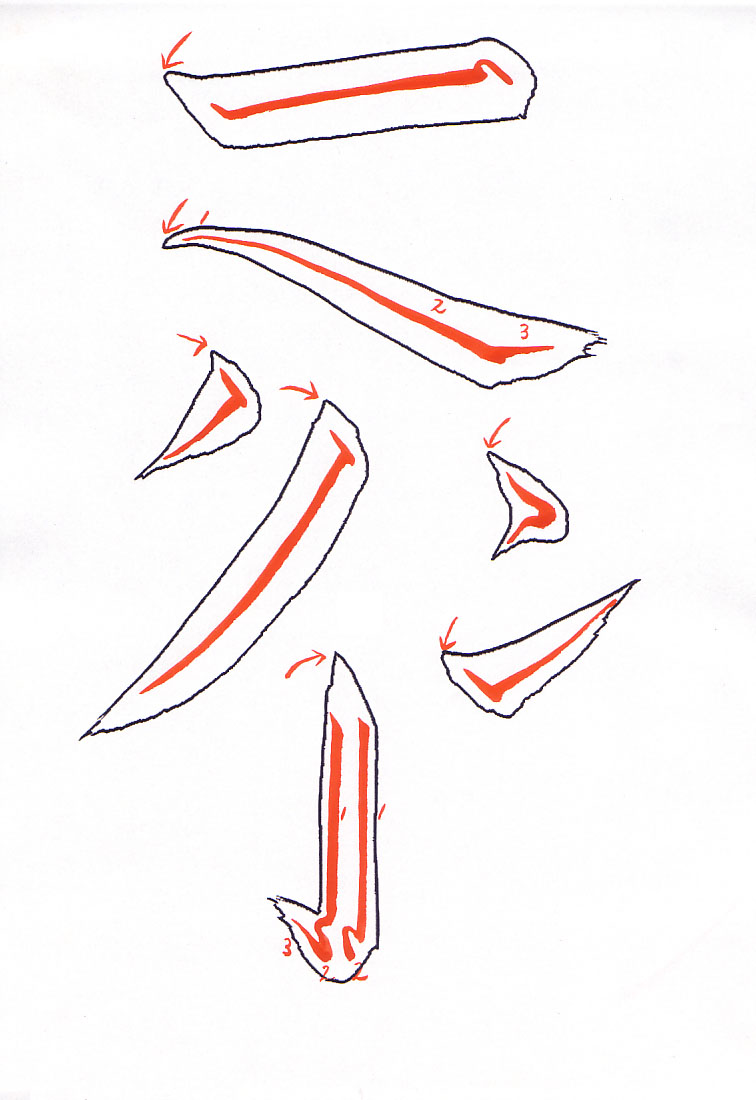 |
| Happou (Eight Strokes) 八法 | Happou (Eight Strokes) 八法 Annotated |
Happou (Eight Strokes) 八法 Sensei Video
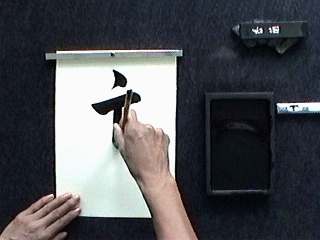
We will now discuss the eight strokes in detail. The eight basic strokes are: 1. yokoga (横画) Horizontal Stroke 2. migibarai (右払い) Right Pullout Stroke 3. hidarihane (左撥ね) Left Flick Stroke 4. hidaribarai (左払い) Left Pullout Stroke 5. ten (点) Dot Stroke 6. migihane (右撥ね) Right Flick Stroke 7. tatega (縦画) Vertical Stroke 8. tategahane (縦画撥ね) Vertical Stroke with Flick Stroke
Note that the harai stroke (migibarai and hidaribarai) is different than the hane stroke (migihane and hidarihane). The harai is a slow pull like a wave moving along the top of the ocean. The hane is a quick motion almost a flick of the brush. The effect is that the harai is a long stroke while the hane is a short stroke.
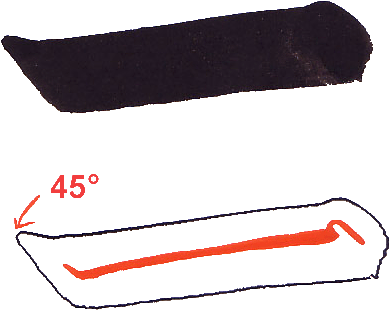
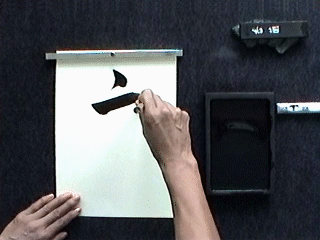
1. Yokoga(横画) Horizontal Stroke. Apply the brush to the paper at a 45 degree angle. Press down gently on the brush and release the pressure. Rotate the brush counterclockwise so the thick part of the brush is facing to the right and slightly upward. The brush is tilted so that the tip of the brush is to the right of the end of the brush. Push the brush to the right using the whole arm and even pressure. To end the line, release pressure and lift the brush up (but not off) the paper, rotate the brush about forty-five degrees clockwise, and then reapply pressure. Then life the brush up and off the paper. This will give a nice ending to the line.
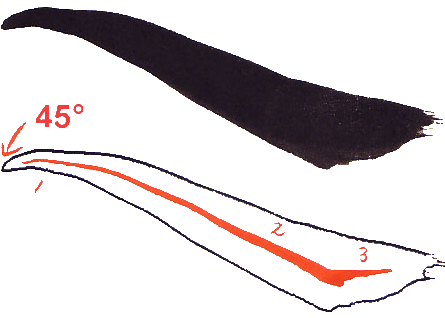
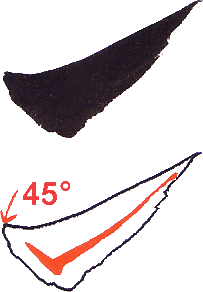
2. Migibarai (右払い) Right Pullout Stroke
This is one of the few strokes where one does not press down on the brush upon touching the brush to the paper.
Apply the brush to the paper at a 45 degree angle but instead of stopping or hesitating as in other strokes, bring the brush down and to the right. As you approach the bottom of the stroke gradually press down on the brush (shown in 2 in the diagram below). At the bottom of the stroke (shown in 3 in the diagram below) pause briefly. Reposition the brush so the thick part of the brush is facing to the right. Then pull the brush slowly to the right while lifting it off the paper giving a nice triangular taper to the stroke.
3. Hidarihane(左撥ね) Left Flick Stroke
Apply the brush to the paper at a 45 degree angle. Press down gently on the brush and come back up a little. Then reposition the brush so the fat part of the brush is facing down and to the left. Tilt the brush so the tip of the brush is to the left and down from the end of the brush. Then in a quick motion bring the brush to the left and down as you bring the brush off the paper.
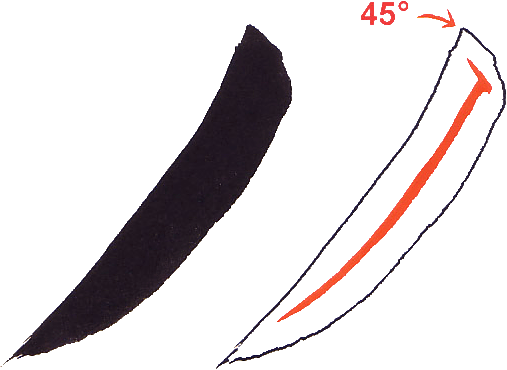
4. Hidaribarai (左払い) Right Pullout Stroke
Apply the brush to the paper at a 45 degree angle. Press down gently on the brush and come back up. Then rotate the brush so the thick end of the curve is in the direction of the stroke. Using consistent pressure and using the entire arm to draw the line, bring the brush to the left and down in a nice smooth arc. As you approach the bottom of the stroke gradually bring the brush off the paper giving a nice taper to the line.
This is a gentle stroke like a wave moving across the ocean and it is also a big stroke with what may seem like an exaggerated movement.
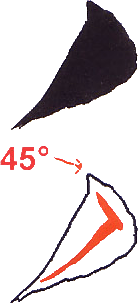
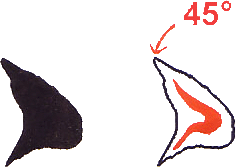
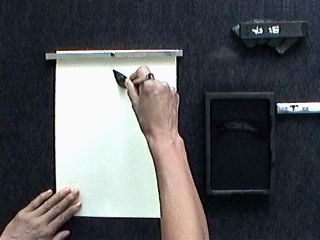
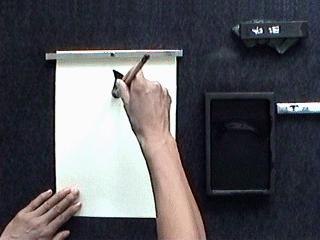
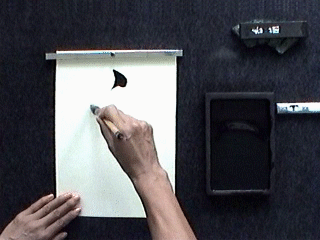
5. Ten (点) Dot Stroke
Apply the brush to the paper at a 45 degree angle. Start with the brush tip and gently pressing down draw the brush at the same 45 degree angle. At the bottom of the stroke, hold the brush briefly and then finish off with a careful stroke to the left and slightly down gradually bringing the brush off the paper and exposing less and less of the brush tip to the paper.
6. Migihane (右撥ね) Right Flick Stroke
Apply the brush to the paper at a 45 degree angle. Press down gently on the brush and come back up a bit. The brush is then rotated so that the thick end of the bend of the bristles is facing to the right and up. The brush is also tilted to the left so the tip of the brush is ahead of the end of the brush. Then in a quick motion bring the brush up and to the right and off the paper.
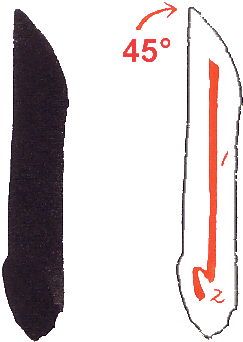
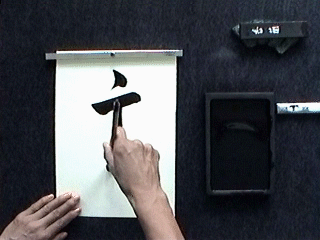
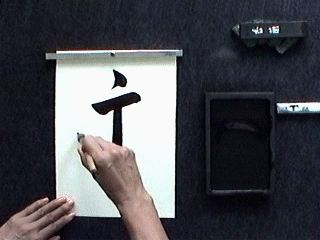
7. Tatega (縦画) Vertical Stroke
Apply the brush to the paper at a 45 degree angle. Press down gently on the brush and come back up a little. The brush is then rotated clockwise so the thick part of the curve of the brush is facing downward. The brush is also tilted so the tip of the brush is well below (towards the bottom of the page) of the end of the brush. Then push the brush straight down using your arm to draw the line.
At the bottom of the stroke raise the brush a bit lifting it from the paper and to the upper left. Finally bring the push down gently on the brush bringing it to the lower right.
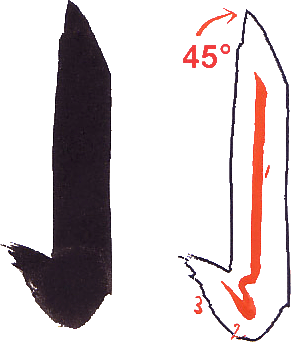
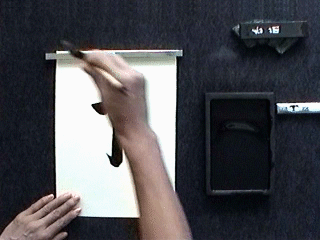
8. Tategahane (縦画撥ね) Vertical Stroke with Flick Stroke
Apply the brush to the paper at a 45 degree angle. Press down gently on the brush and come back up a little. The brush is then rotated clockwise so the thick part of the curve of the brush is facing downward. The brush is also tilted so the tip of the brush is well below (towards the bottom of the page) of the end of the brush. Then push the brush straight down using your arm to draw the line.
At the bottom of the stroke rotate the brush so the thick part of the brush is facing down and to the left. Draw a slight 45 degree angle line. Rotate the brush again clockwise so the thick part of the brush is facing to the left and upwards. Finish the line with a hane stroke to the upper left.
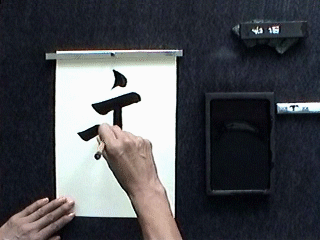
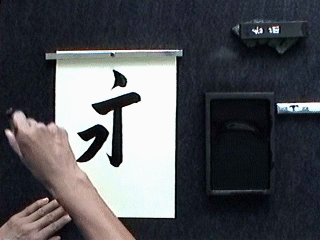
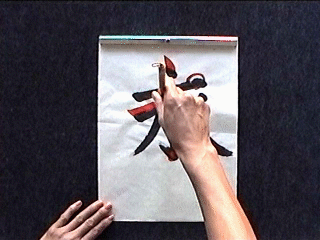
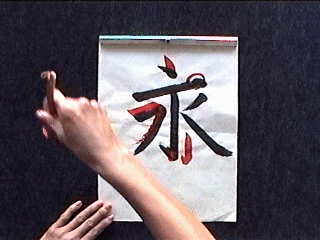
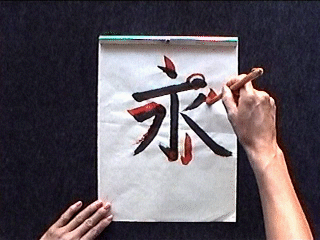
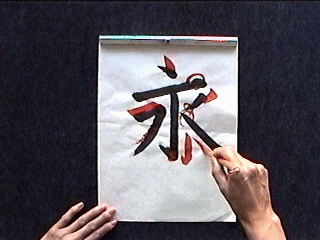
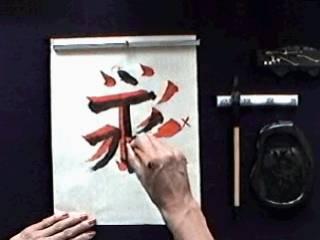
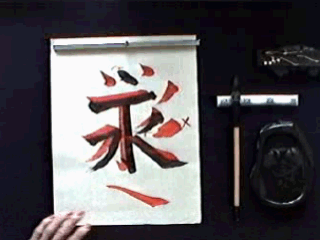
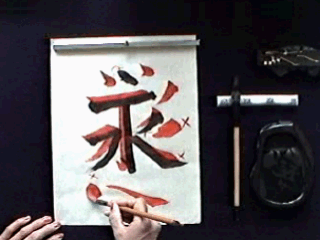
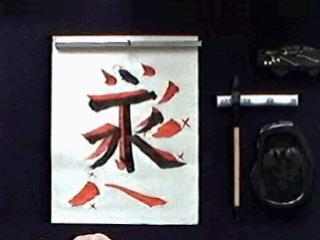
Now that we have seen each stroke in detail, let us go back to the Ei character and look at each step in detail. This might be a good time to revisit the Ei (Eternity) Video. Press the back button when finished to return here.
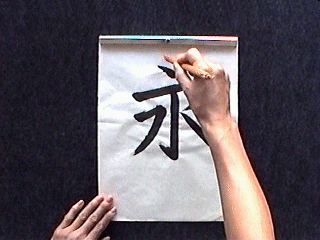
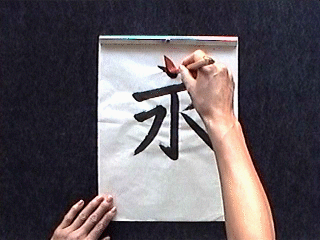
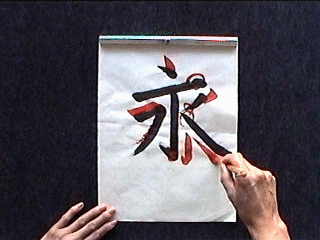
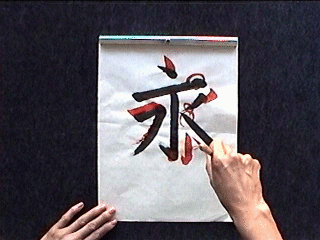
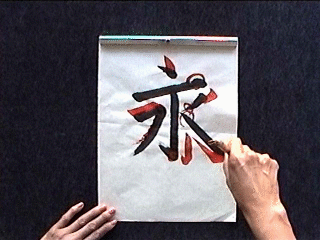
| Ei (Eternity) 永 Sensei Video - Frame by Frame Analysis | |

1. Note that the brush is properly held with the brush end slightly to the right and towards the calligrapher. |
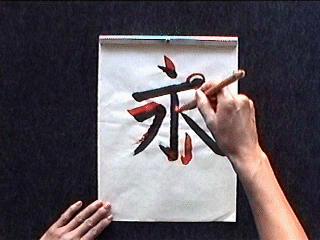
2. The main body of the ten is completed and with a slight pause the tail will be pulled |
3. The ten is finished off |
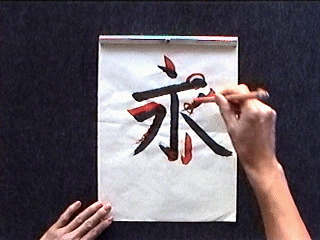
4. Most strokes begin by applying the brush at a 45 degree angle. The brush is then pushed down and then back up before starting the horizontal motion. |
5. With a consistent pressure on the brush draw the line. |
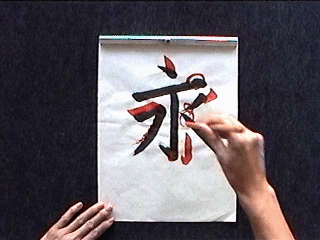
6. The pressure for each stroke must be the same to ensure a consistent line width. One cannot hesitate on the line or this will show - the line must be drawn in one stroke. |
7. At the bottom of the tategahane, the brush is brought a bit to the left and down drawing a short 45 degree angle line. |
8. Finish up the tategahane by completing the hane. |
9. Begin the migihane by applying the brush to the paper at a 45 degree angle. |
10. For this hane, the flick is not pronounced. At the end of the stroke we start the hidaribarai. The way this has been done is more like a tensetsu with a slight 45 degree angle line connecting the two strokes. |
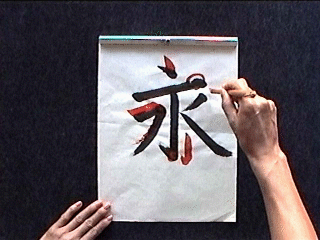
11. Do not use your wrist to draw the hidaribarai. Rather use your entire arm. The stroke will appear to be exaggerated, but using large movements of the arm is correct technique. |
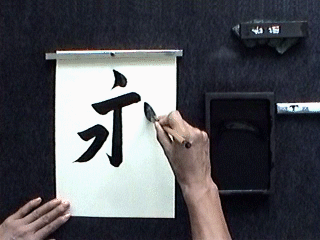
12. Begin the hidarihane like most other strokes by applying the brush to the paper in a 45 degree angle. This line does use more speed than the harai. |
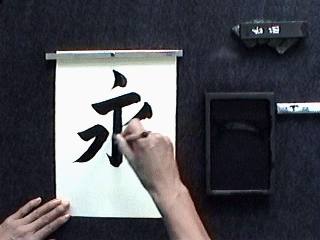
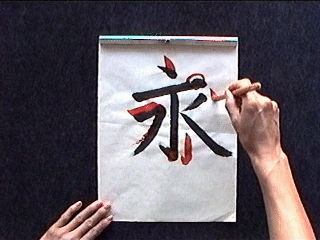
13. End the stroke with a large motion. The video shows that the arm goes well across the page. Be sure to note the relative speed of the stroke. |

14. For the migibarai, pressure is not added to the brush at the beginning. |
15. Pull the brush to the right and down. Gradually adding pressure to increase the line thickness. Pause at the bottom of the line and readjust the brush so the fat part of the brush is facing to the right. |
16. Finally pull the brush while lifting it from the paper to a point. This migibarai is deliberate and controlled. |
| Ei (Eternity) 永 Student 1 Video | |
| Ei (Eternity) 永 Student 1 | Ei (Eternity) 永 Student 1 Critique |
| Ei (Eternity) 永 Student 1 - Frame by Frame Analysis | |
1. The ten must be started with the brush applied at a 45 degree angle. |
2. The brush is pressed down (towards the paper) and slightly towards the bottom of the paper. |

3. At the bottom of the ten the brush is repositioned to begin the tail stroke. |

4. The tail is started and the brush is positioned to that as it is brought off of the paper the small part of the tip will draw the final part of the line. |
5. Note the curve to the tip of the brush. This C shape to the brush happens once the brush is applied to the paper. Considerable effort is made to take advantage of this shape to give a good form to the lines on the paper. |
6. There is a rather nice mountain shape to the end of this yokoga. |

7. In the tategahane, the student went directly to the hane upon reaching the bottom of the line. This is not correct. |

8. At the bottom of the tategahane line there is a pause and slight 45 degree angle line is drawn to the left and down. |
9. From the end of this small 45 degree angle line the hane is performed. |
10. Once again at the end of the vertical component of the tategahane line is a short pause. |
11. Then a short 45 degree angle line to the left and down is drawn. |
12. And the final hane is quick with a large movement of the hand. |
13. Begin the tensetsu line by applying the brush at a 45 degree angle. The hand is then rotated so the fat part of the brush is facing to the right and slightly towards the top of the paper. |
14. With an even pressure draw the horizontal component. At the end of the line, then a slight 45 degree angle line that goes to the right and down is drawn. |
15. The brush is now reposition for the harai part of the line. |
16. The harai requires a large movement with the brush bring brought off the page as the line is drawn. |
17. The hidarihane needs to start by applying the brush at a 45 degree angle. |
18. The brush is pressed down towards the paper and then slightly towards the bottom of the page and then paused. |
19. During the pause the brush is repositioned so the fat part of the bristles is towards the direction of the line to be drawn which is now towards the lower left. |
20. The hane is quick with a large motion. |
21. The student finished the hidarihane nicely. |
22. The student's beginning of the migibarai is fine. |
23. The migibarai is unique in that the brush is started at a 45 degree angle and as the line is drawn pressure is applied to the brush. This gives the start of the line a gradually increasing thickness. |
24. At the end of the migibarai is a definite pause as the brush is readjusted. |
25. The fat part of the brush has been readjusted to face to the right. |
26. The brush is pulled slowly to the right as it is brought off of the paper giving a nice triangular ending to the line. |
Ei (Eternity) 永 Student 1 Critique Close-up
| Ei (Eternity) 永 Student 2 Video | |
| Ei (Eternity) 永 Student 2 | Ei (Eternity) 永 Student 2 Critique |

Ei (Eternity) 永 Student 2 Critique Close-up
| Happou (Eight Strokes) 八法 Student 1 - Frame by Frame Analysis | |
1. The student's application of the brush to the paper was at a 45 degree angle which is fine. The problem is that the student lifted the brush trying to finish the tail with the tip of the brush. What one should do is pull the brush down and to the left while moving it off the paper. |
2. The student did not start the yokoga correctly. The application of the brush to the paper should be at a 45 degree angle. |
3. For the yokoga (Horizontal Line) constant pressure needs to be applied throughout the stroke. Otherwise the result will be as here giving a variable line width. |
4. The tatega (Vertical Line) was not started with the standard 45 degree application of the brush to the paper which should have been done. Notice also that at the bottom of the stroke, the movement to the left and down was not done. |
5. The tategahane is finished with a quick, large motion. |
6. Notice the difference in the bottom of the tategahane between the student and the sensei version. |
7. Don't use the back or side of the brush to create the hidarihane. This is avoided by rotating the brush clockwise and drawing with the fat part of the brush facing the direction of the stroke. |
8. The migibaraineeds to start from the middle of the tatega - The student started well to the right. |

9. Stop the brush at the bottom of the migibarai. The brush will then be pulled to the right as it is lifted from the paper to create a nice triangular shape. |
10. Here is the completed migibarai. |
11. In the hidarihane the back of the brush was used as in this example. This is not correct. The tip and end of the brush should be used for this stroke. |
12. The final frame shows how the incorrect hidarihane would looks. |