
Lesson 18
空 sora · Sky
1. The character
sora 空 means sky and is also read as kū. There is another Japanese reading for sora which is kara and when read this way means "empty". Combine this reading with the kanji 手 from Lesson 14 and we have 空手 which is read karate and literally translates as "empty hand".
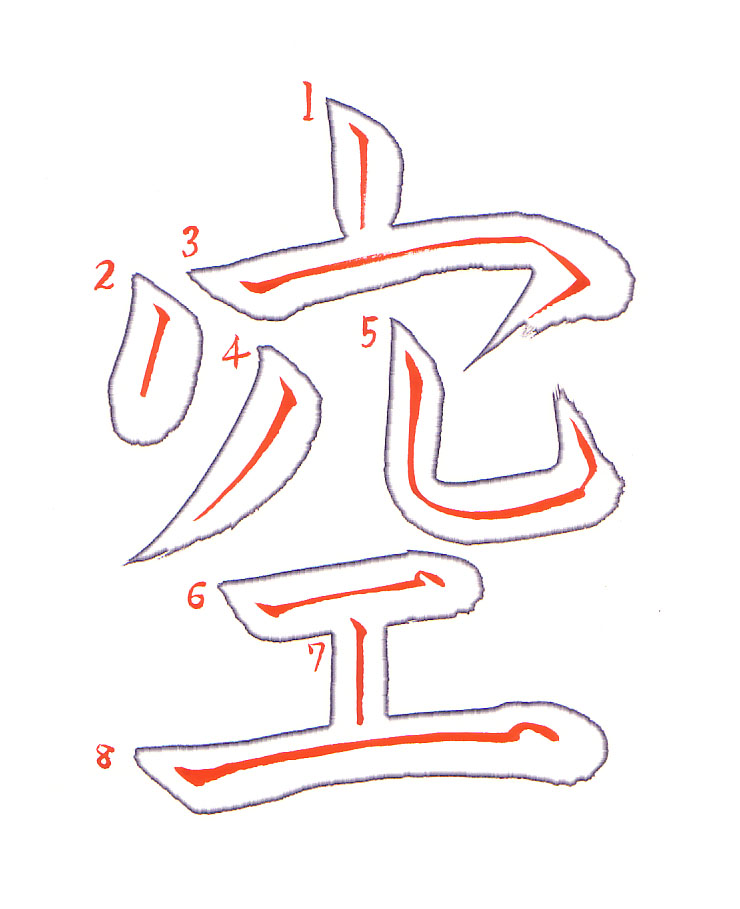
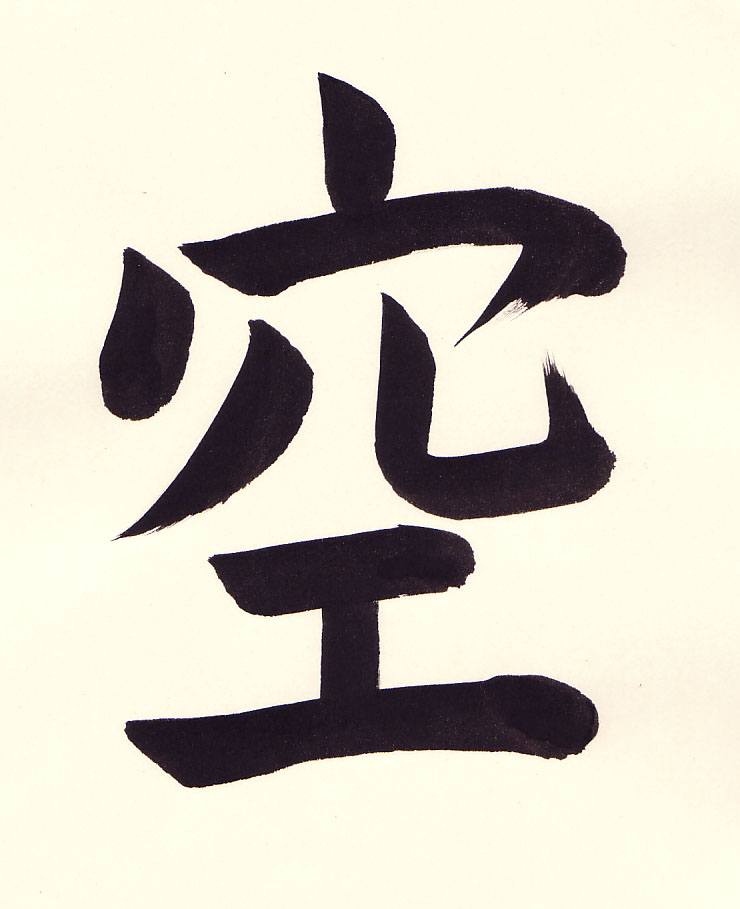
- 0:09 Apply the brush to the paper at a 45 degree angle.
- 0:10 Press down gently on the brush and come back up a little. The brush is then rotated clockwise so the thick part of the curve of the brush is facing downward. The brush is also tilted so the tip of the brush is well below (towards the bottom of the page) the end of the brush.
- 0:11 Then push the brush straight down using your arm to draw the line.
- 0:12 The line is ended by bringing the brush up and off the paper.
- 0:15 Apply the brush to the paper at a 45 degree angle.
- 0:16 Press down gently on the brush and come back up a little. The brush is then rotated clockwise so the thick part of the curve of the brush is facing downward. To end the stroke, the brush is lifted a bit and reapplied very briefly.
- 0:18 Finally the brush is lifted in an upward stroke.
- 0:19 For the tensetsu apply the brush at a 45 degree angle. Press down gently on the brush and release the pressure. Rotate the brush counterclockwise so the thick part of the brush is facing to the right and slightly upward. The brush is tilted so that the tip of the brush is to the right of the end of the brush.
- 0:20 Push the brush to the right using the whole arm and even pressure.
- 0:22 At the end of the stroke rotate the brush so the thick part of the brush is facing down and to the right.
- 0:22 Draw a slight 45 degree angle line.
- 0:22 Rotate the brush again clockwise so the thick part of the brush is facing to the left and down towards the bottom of the paper.
- 0:24 Finish the line with a hane stroke to the lower left.
- 0:32 The hidaribarai stroke is a deliberate and long motioned stroke.
- 0:41 The hane stroke at the end of the curved line is a quick stroke with a large motion.
- 0:49 Note the placement of the first yokoga which is in tight with the top part.
- 0:54 Begin the tatega in the middle of the yokoga.
- 0:57 The tatega is finished by bringing the brush up and off the paper.
- 1:04 The final yokoga is slightly convex and solid.
- 1:08 The whole character is nicely balanced and solid.
2. How students did
A student’s 空
The student’s video, without corrections
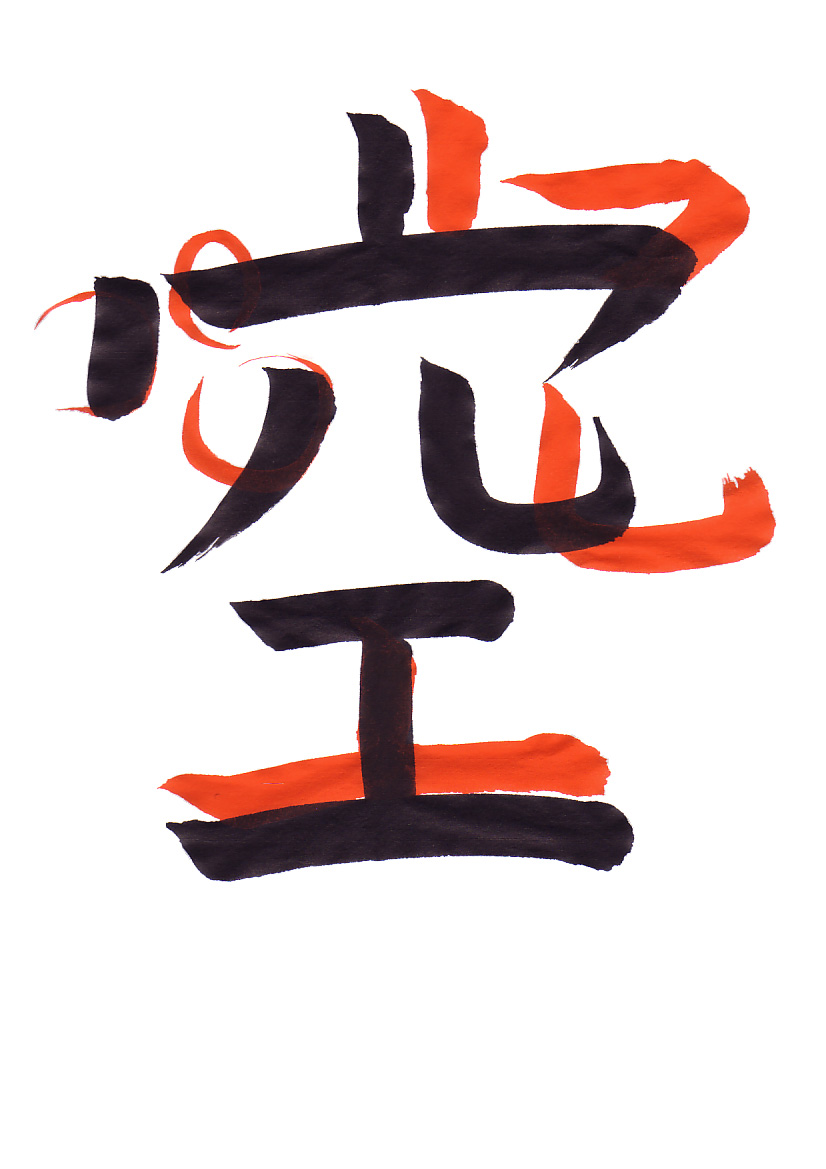
- 0:06 The tatega should be sharper with a consistent taper.
- 0:09 The tatega is okay.
- 0:10 The start of the tensetsu is fine.
- 0:14 The corner of the tensetsu can be improved. When at the end of the horizontal component, pause very briefly and rotate the brush clockwise to face the thick end of the brush down and to the right.
- 0:15 Draw a very short 45 degree angle line and rotate the brush once again to face down and to the left.
- 0:17 Finish the line with a hane stroke to the lower left.
- 0:17 The hane is a quick stroke with a large motion.
- 0:22 The hidaribarai could have a more defined start, but is fine.
- 0:30 The curved line has the vertical component that is very slightly slanted to the left. The curve is large and squarish. At the end of the horizontal component the brush is repositioned to draw a very short 45 degree angle line that is up and to the right.
- 0:31 The brush is repositioned once again for the final hane stroke.
- 0:33 Again, the hane stroke is a quick and large motion.
- 0:39 The tatega is too long.
- 0:41 The yokoga also needs to be brought up a bit.
- 0:43 At the end of the line, pause very briefly.
- 0:46 Raise the brush a bit and then again gently press down on the brush at a slight upward angle and then again at a downward angle.
- 0:47 The lines are getting better. Remember to focus on getting the lines and strokes just right. We will focus on the overall shape of the characters in the future.
Another student’s 空
The student’s video, without corrections
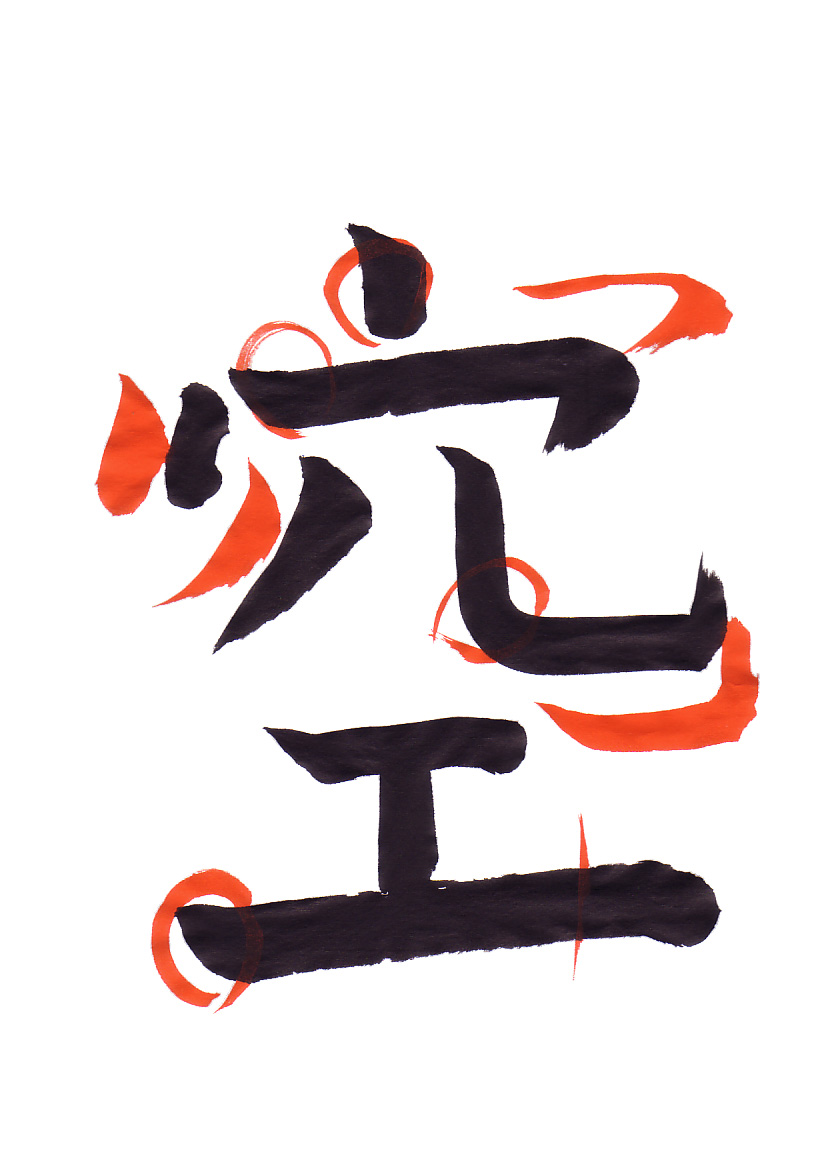
- 0:02 The tatega is fine.
- 0:03 The tatega on the side is thin and weak without a nice taper. Apply the brush to the paper at a 45 degree angle.
- 0:04 Press down gently on the brush and come back up a little. The brush is then rotated clockwise so the thick part of the curve of the brush is facing downward. The brush is also tilted so the tip of the brush is well below (towards the bottom of the page) the end of the brush.
- 0:06 Then push the brush straight down using your arm to draw the line. At the bottom of the stroke raise the brush a bit and then reapply pressure.
- 0:07 Finish the line by bringing the brush up and off the paper.
- 0:10 The start of the tensetsu is fine.
- 0:14 The corner of the tensetsu is too rounded. At the end of the horizontal component pause briefly and rotate the brush clockwise a bit.
- 0:15 Notice the brush is rotated so the thick part of the brush is facing down and to the right. Here the very short 45 degree angle line is being drawn that will give a nicely angled corner.
- 0:15 The brush is once again rotated clockwise to begin the hane stroke.
- 0:16 The hane stroke is quick and large.
- 0:23 For the hidaribarai stroke the student applied the brush at a 45 degree angle again and pressed down, but then continued the stroke using the side of the brush. To give a nice appearance the brush needs to be rotated clockwise and the thick part of the brush needs to face the direction of the stroke. Do not write with the side of the brush.
- 0:27 The curve is fine.
- 0:29 The horizontal component is long, but the real trouble is the end of the stroke. When at the end of the horizontal component pause very briefly and reposition the brush so the thick part of the brush faces up and to the right.
- 0:31 A very short 45 degree angle line is drawn.
- 0:33 Then the brush is again rotated so the thick part is facing up and the line is completed with a quick hane stroke.
- 0:37 The second yokoga is too long.
- 0:39 The start of the second yokoga is fine.
- 0:40 Progress is being made with the lines and strokes.
3. End of Section 3: kaisho Basic
Keep practicing and don't hesitate to go back to lessons 2 and 3 and practice the basic strokes. If one stroke is weaker than the others go ahead and practice that single stroke.
In Section 4 we will work on two character samples. Section 4 is the last section devoted strictly to lines and strokes. In Section 5 we will divert our attention to mastering katakana and in subsequent sections we will focus on the form of the kanji in the kaisho script and will also cover lesser used lines and strokes.
For more about the lessons see Takase Shodokai - Learn Japanese Calligraphy.
Vocabulary
| Romaji | Kana | Kanji | English | Audio |
|---|---|---|---|---|
| hane | はね | 撥ね | Flick Stroke | audio |
| hidaribarai | ひだりばらい | 左払い | Left Pullout Stroke | audio |
| sora | そら | 空 | Sky | audio |
| tatega | たてが | 縦画 | Vertical Stroke | audio |
| ten | てん | 点 | Dot Stroke | audio |
| tensetsu | てんせつ | 転折 | Continued Lines | audio |
| yokoga | よこが | 横画 | Horizontal Line | audio |