
Lesson 17
光 hikari · Light
1. The character
hikari 光 means light and is also read as kō. We will work on creating a nice balance between the hidaribarai and the long curved stroke on the right ending in a hane stroke.
hikari (Light) 光 — sensei video
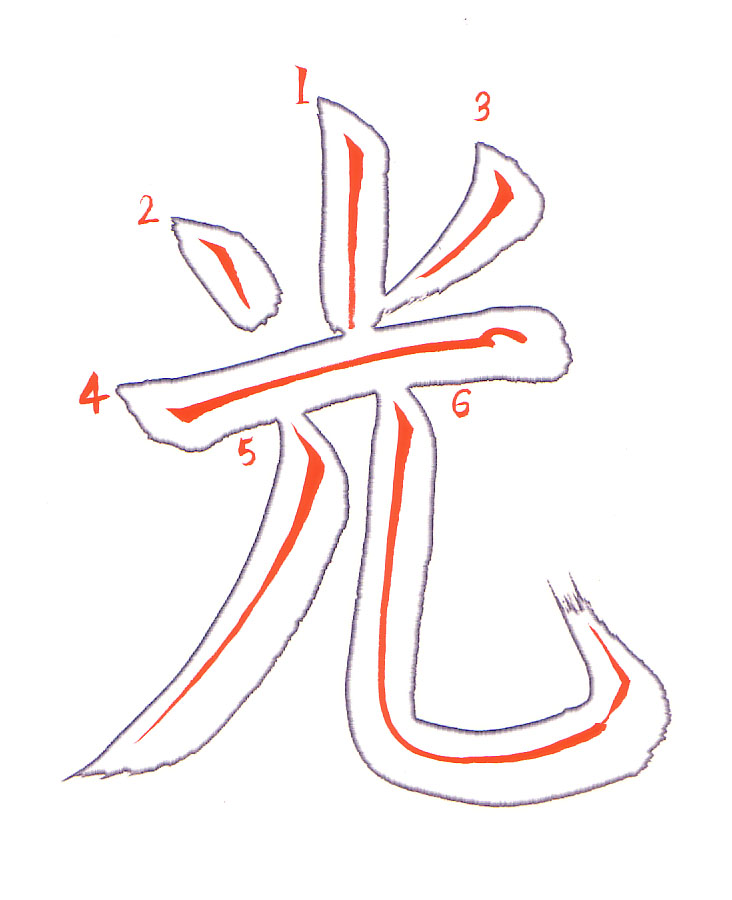
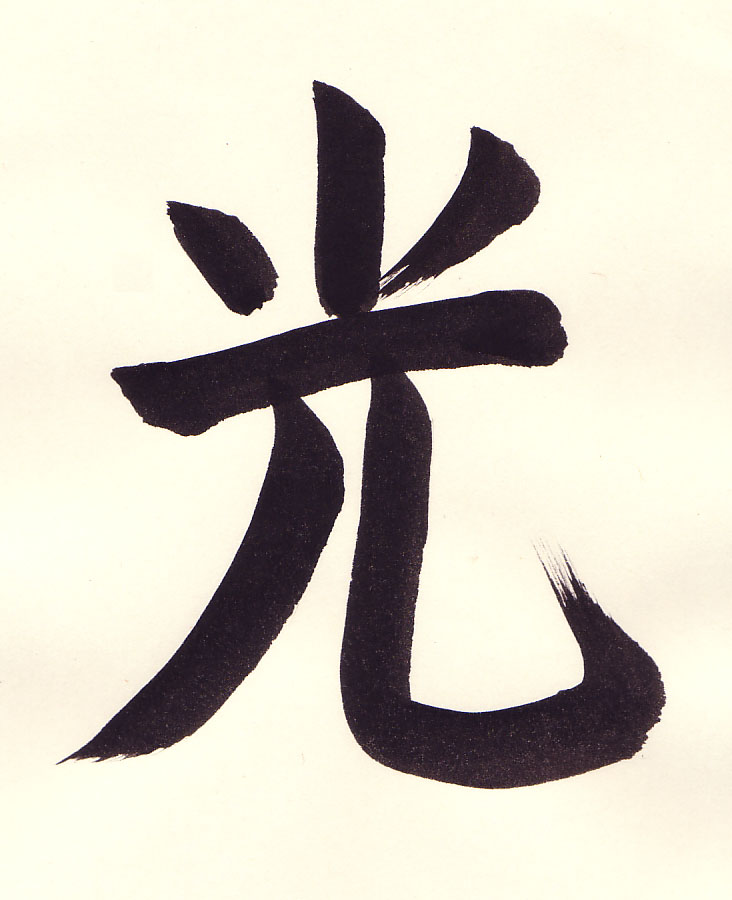
- 0:03 Start the tatega in the middle and towards the top of the paper. Apply the brush to the paper at a 45 degree angle.
- 0:04 Press down gently on the brush and come back up a little.
- 0:05 Then rotate the brush clockwise so the thick part of the brush is towards the bottom of the page. The brush is also tilted so the tip of the brush is well below (towards the bottom of the page) the end of the brush.
- 0:07 To end the stroke, the brush is lifted a bit and reapplied very briefly. Finally the brush is lifted in an upward stroke (towards the top of the paper) and off of the paper.
- 0:11 For the ten, apply the brush to the paper at a 45 degree angle.
- 0:13 Press down gently on the brush and come back up a little.
- 0:13 To end the stroke, the brush is lifted a bit and reapplied very briefly and then brought up and off the paper.
- 0:16 For the hidarihane stroke, apply the brush to the paper at a 45 degree angle.
- 0:16 Press down gently on the brush and come back up a little.
- 0:17 Then reposition the brush so the thick part of the brush is facing down and to the left. Tilt the brush so the tip of the brush is to the left and down from the end of the brush.
- 0:18 Then in a quick motion bring the brush to the left and down as you bring the brush off the paper.
- 0:22 For the yokoga, apply the brush to the paper at a 45 degree angle.
- 0:22 Press down gently on the brush and release the pressure.
- 0:24 Rotate the brush counterclockwise so the thick part of the brush is facing to the right and slightly upward. The brush is tilted so that the tip of the brush is to the right of the end of the brush. Push the brush to the right using the whole arm and even pressure. At the end of the line, raise the brush a bit and then again gently press down on the brush at a slight angle.
- 0:26 The brush is then brought off the paper and to the left to finish the stroke.
- 0:31 Begin the hidaribarai by applying the brush to the paper at a 45 degree angle.
- 0:32 Press down gently on the brush and come back up. Then rotate the brush so the thick end of the curve is in the direction of the stroke.
- 0:33 Then using consistent pressure and using the entire arm to draw the line, bring the brush to the left and down in a nice smooth arc.
- 0:34 As you approach the bottom of the stroke gradually bring the brush off the paper giving a nice taper to the line.
- 0:37 Apply the brush at a 45 degree angle. Press down gently on the brush and come back up. Then rotate the brush so the thick end of the curve is in the direction of the stroke.
- 0:39 Then push the brush straight down using your arm to draw the line.
- 0:40 And continue with even pressure to draw the curve.
- 0:41 At the end of the stroke rotate the brush so the thick part of the brush is facing slightly upward and to the right. Draw a slight 45 degree angle line.
- 0:42 Rotate the brush again counterclockwise so the thick part of the brush is facing to the left and upwards.
- 0:42 Finish the line with a hane stroke to the upper left.
- 0:46 This has a nicely balanced and solid form.
2. How students did
A student’s 光
The student’s video, without corrections
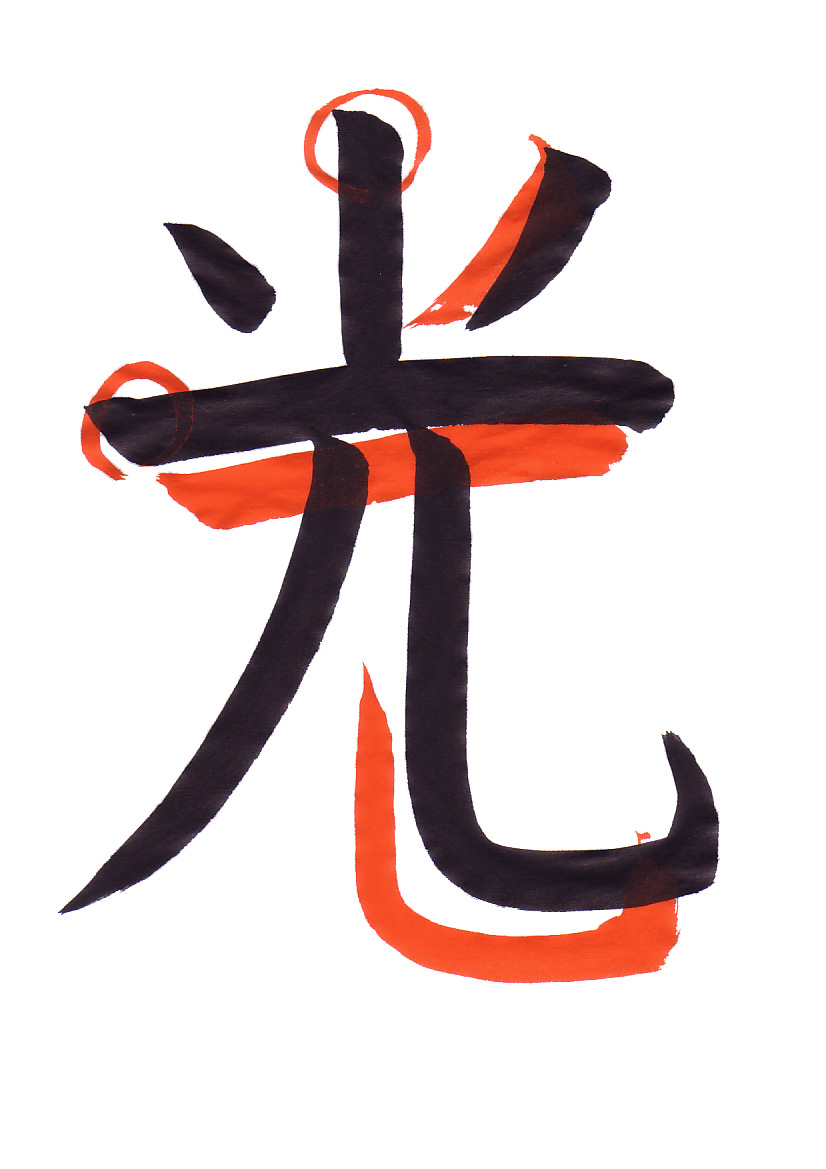
- 0:04 The tatega is fine.
- 0:08 The hidarihane should be in closer and should point to just above the corner.
- 0:08 The hidarihane is a large, quick stroke. This image shows nicely how the brush bends into a C shape.
- 0:14 The yokoga has a nice start.
- 0:19 The yokoga should be angled slightly upward. The student created a concave line instead.
- 0:20 At the end of the line, raise the brush a bit and then again gently press down on the brush at a slight angle.
- 0:21 The brush is brought off the line by moving to the left and up off the paper.
- 0:31 At the end of the curved stroke pause very briefly and rotate the brush so the thick part of the brush is facing slightly upward and to the right.
- 0:33 Draw a slight 45 degree angle line. Then rotate the brush again counterclockwise so the thick part of the brush is facing to the left and upwards.
- 0:36 Finish the line with a hane stroke to the upper left.
Another student’s 光
The student’s video, without corrections
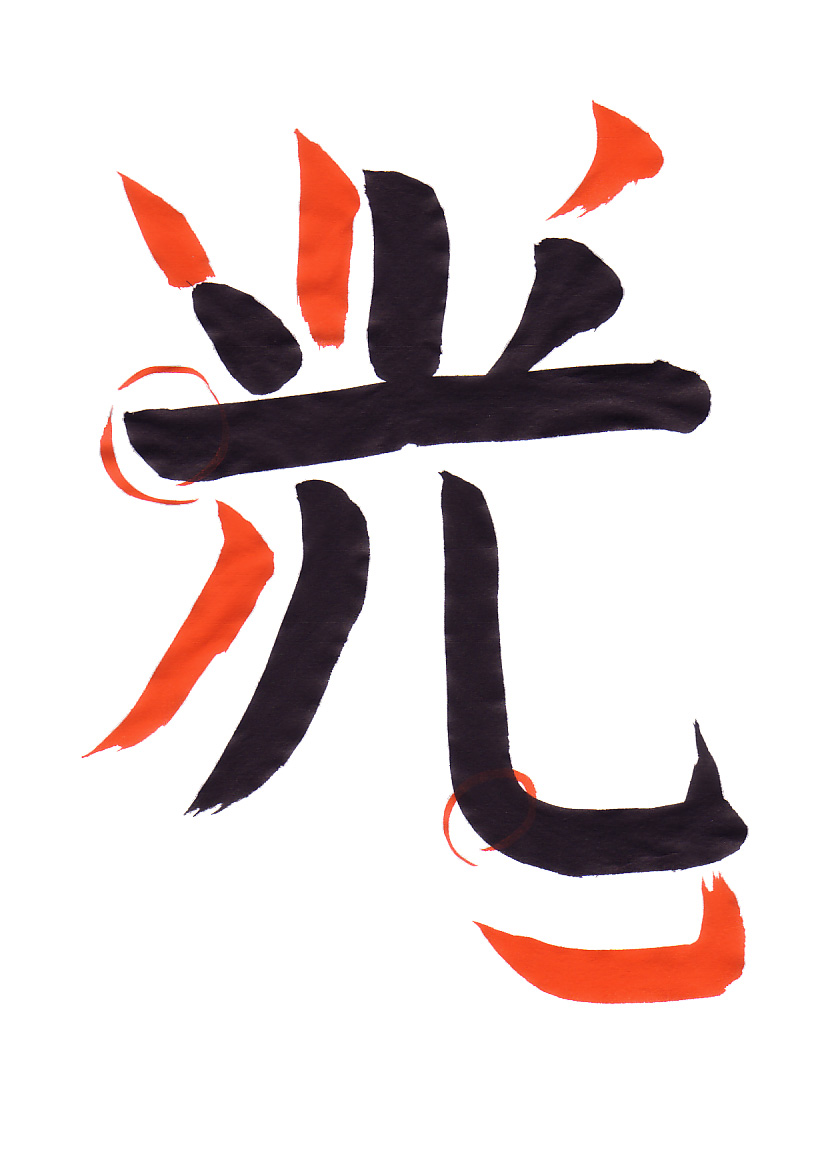
- 0:07 The tatega has several problems. The start should have a nice crisp tapered edge. Some calligraphers call this a sword edge because it looks like the tip of a Japanese sword. Also the bottom of the line should not be thicker than the rest of the line.
- 0:19 For the ten the student went almost straight down to create this oblong look. The brush should be applied at a 45 degree angle, then very slightly pulled down to the lower right. Then press downward slightly on the brush and bring the brush up and off the paper.
- 0:24 The student's hidarihane stroke is not right. Begin by applying the brush at a 45 degree angle.
- 0:24 Press down gently on the brush and come back up a little.
- 0:26 Then reposition the brush so the thick part of the brush is facing down and to the left. Tilt the brush so the tip of the brush is to the left and down from the end of the brush.
- 0:27 Then in a quick motion bring the brush to the left and down as you bring the brush off the paper.
- 0:31 The start of the yokoga is fine.
- 0:33 The hidaribarai is not right. Start by applying the brush at a 45 degree angle. Press down gently on the brush and come back up. Then rotate the brush so the thick end of the curve is in the direction of the stroke. Then using consistent pressure and using the entire arm to draw the line, bring the brush to the left and down in a nice smooth arc.
- 0:37 As you approach the bottom of the stroke gradually bring the brush off the paper giving a nice taper to the line.
- 0:43 The curve is fine.
- 0:46 The student did not draw the slight 45 degree angle line at the end of the stroke and so it bulges out.
- 0:47 At the end of the stroke rotate the brush so the thick part of the brush is facing slightly upward and to the right. Draw a slight 45 degree angle line.
- 0:49 Rotate the brush again counterclockwise so the thick part of the brush is facing to the left and upwards.
- 0:49 Finish the line with a hane stroke to the upper left.
Vocabulary
| Romaji | Kana | Kanji | English | Audio |
|---|---|---|---|---|
| hane | はね | 撥ね | Flick Stroke | audio |
| hidaribarai | ひだりばらい | 左払い | Left Pullout Stroke | audio |
| hikari | ひかり | 光 | Light | audio |
| tatega | たてが | 縦画 | Vertical Stroke | audio |
| ten | てん | 点 | Dot Stroke | audio |
| yokoga | よこが | 横画 | Horizontal Line | audio |