
Lesson 21
春風 harukaze · Spring Wind
1. The character
harukaze 春風 combines Spring 春 haru and Wind 風 kaze.
harukaze (Spring Wind) 春風 — sensei video
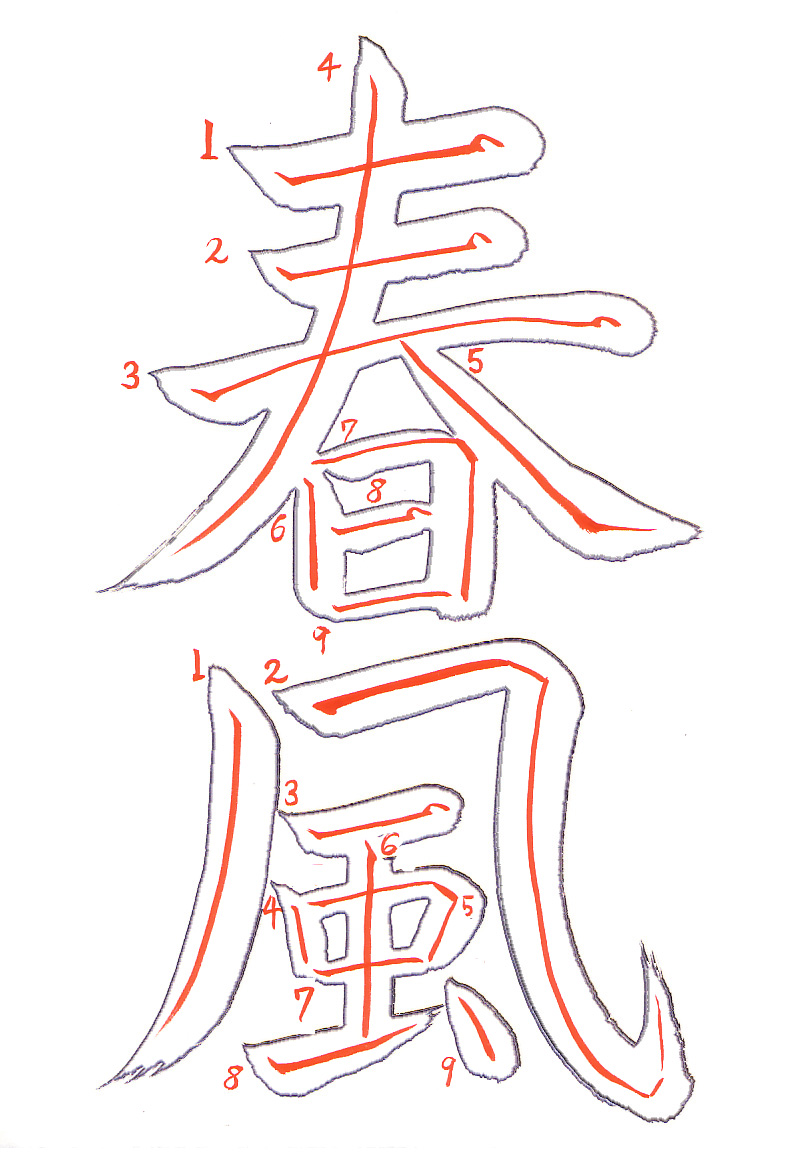
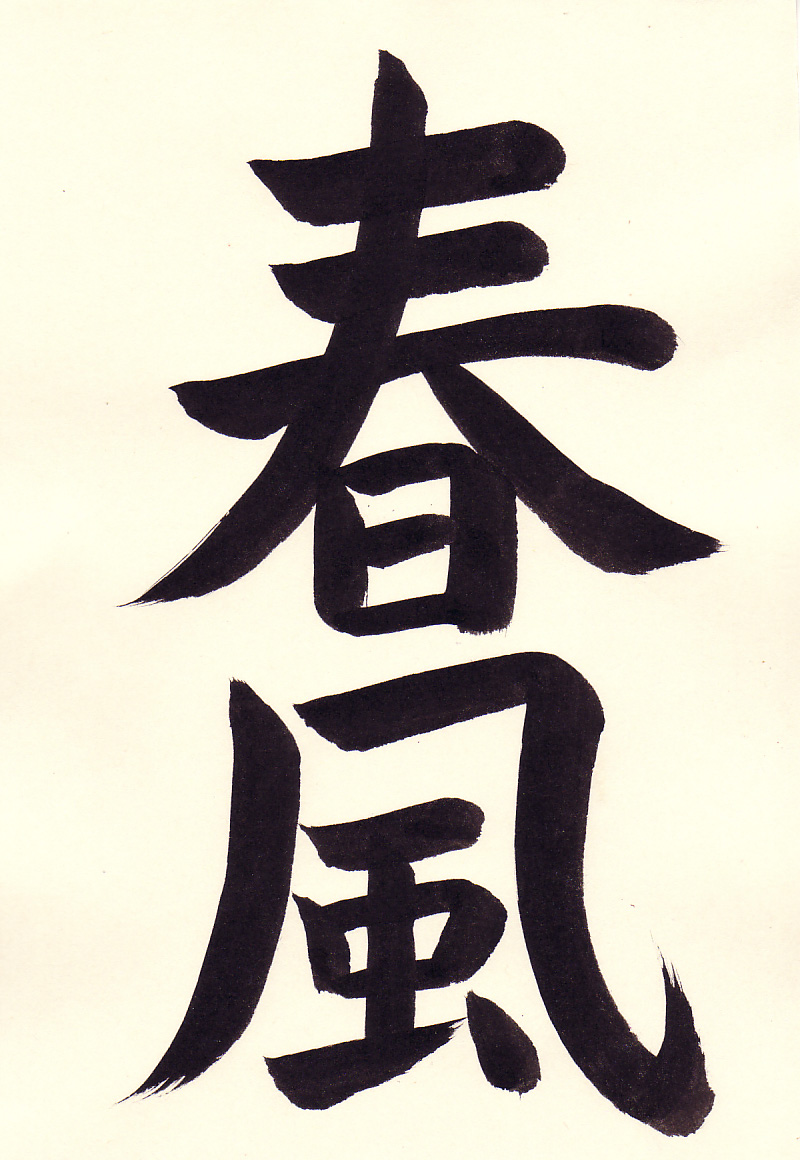
- 0:15 The first two yokoga are slanted slightly upward.
- 0:17 For the fu style yokoga, apply the brush to the paper at a 45 degree angle. Press down on the brush slightly and release. Then rotate the brush counterclockwise so the thick part of the brush faces to the right and slightly upward.
- 0:17 The fu line is convex in that it bows slightly upward. Also the pressure on the brush is released slightly as one moves towards the middle of the line and reapplied as one moves away from the middle. This gives the line a varied thickness.
- 0:18 Note how the line is being drawn using the arm and the position of the brush has not changed.
- 0:18 To end the stroke the brush is lifted upward (towards the top of the paper) and the top of the line is filled out.
- 0:19 The brush is then brought down and around to fill the bottom part of the line.
- 0:19 The brush is being lifted off of the paper as it is being brought to the left.
- 0:19 The brush is off the paper.
- 0:22 Begin the hidaribarai by applying the brush to the paper at a 45 degree angle.
- 0:23 Press down gently on the brush and come back up. Then rotate the brush so the thick end of the curve of the brush is in the direction of the stroke.
- 0:23 Using consistent pressure and using the entire arm to draw the line, bring the brush to the left and down in a nice smooth arc.
- 0:24 Note how the brush position has not changed and the arm is being used to draw the line.
- 0:25 As you approach the bottom of the stroke gradually bring the brush off the paper giving a nice taper to the line.
- 0:26 This is a large motion stroke.
- 0:28 For the migibarai, apply the brush to the paper at a 45 degree angle.
- 0:29 Instead of stopping or hesitating as in other strokes, bring the brush down and to the right.
- 0:30 As you approach the bottom of the stroke gradually press down on the brush.
- 0:30 At the bottom of the stroke pause briefly to reposition the brush.
- 0:31 Rotate the brush counterclockwise so the thick part of the brush is facing to the right.
- 0:32 Then pull the brush slowly to the right while lifting it off the paper giving a nice triangular taper to the stroke.
- 0:35 The tatega is drawn from within the hidaribarai.
- 0:36 Press down gently on the brush and come back up a little.
- 0:37 To end the stroke, the brush is lifted a bit and reapplied very briefly.
- 0:38 Finally the brush is lifted in an upward stroke (towards the top of the paper) and off of the paper.
- 0:43 Draw the tensetsu.
- 0:46 This shows haru finished.
- 0:50 kaze is started with a long almost vertical hidaribarai. Apply the brush to the paper at a 45 degree angle.
- 0:51 Press down gently on the brush and come back up. Then rotate the brush so the thick end of the curve is in the direction of the stroke.
- 0:52 Using consistent pressure and using the entire arm to draw the line, bring the brush to the left and down in a nice smooth arc.
- 0:53 As you approach the bottom of the stroke gradually bring the brush off the paper giving a nice taper to the line.
- 0:53 This is a large, deliberate stroke.
- 0:55 Begin this tensetsu by applying the brush at a 45 degree angle. Press down gently on the brush and release the pressure.
- 0:56 Rotate the brush counterclockwise so the thick part of the brush is facing to the right and slightly upward. The brush is tilted so that the tip of the brush is to the right of the end of the brush. Push the brush to the right using the whole arm and even pressure.
- 0:57 At the end of the horizontal stroke, pause and rotate the brush clockwise a bit so the thick part of the brush is facing to the right and down. Draw a short 45 degree angle line.
- 0:58 Note how the hand position is changed to bring the thick end of the brush in line with the direction of the line to be drawn.
- 0:59 Use the entire arm to draw the vertical component that is angled slightly to the left.
- 1:00 The line is then curved outward to the right. At the end of the line pause to rotate the brush so the thick end faces to the right and up.
- 1:01 Draw a short 45 degree angle line and then reposition the brush once again to align the thick part of the brush with the hane stroke.
- 1:02 The hane stroke is upward with a quick and large movement.
- 1:16 Draw the internal part of the character.
- 1:21 Draw the internal tatega.
- 1:23 For the migihane, apply the brush to the paper at a 45 degree angle.
- 1:24 Press down gently on the brush and come back up a bit. The brush is then rotated so that the thick end of the bend of the bristles is facing to the right and up. The brush is also tilted to the left so the tip of the brush is ahead of the end of the brush.
- 1:24 Then in a quick motion bring the brush up and to the right and off the paper.
- 1:25 The migihane is a quick stroke.
- 1:26 For the ten, apply the brush at a 45 degree angle.
- 1:26 Press down on the brush.
- 1:27 Bring the brush down and to the right in a slight 45 degree angle line. Then press down on the brush.
- 1:28 The brush is then brought up and off the paper.
- 1:31 The final work is nicely balanced.
2. How students did
A student’s 春風
The student’s video, without corrections
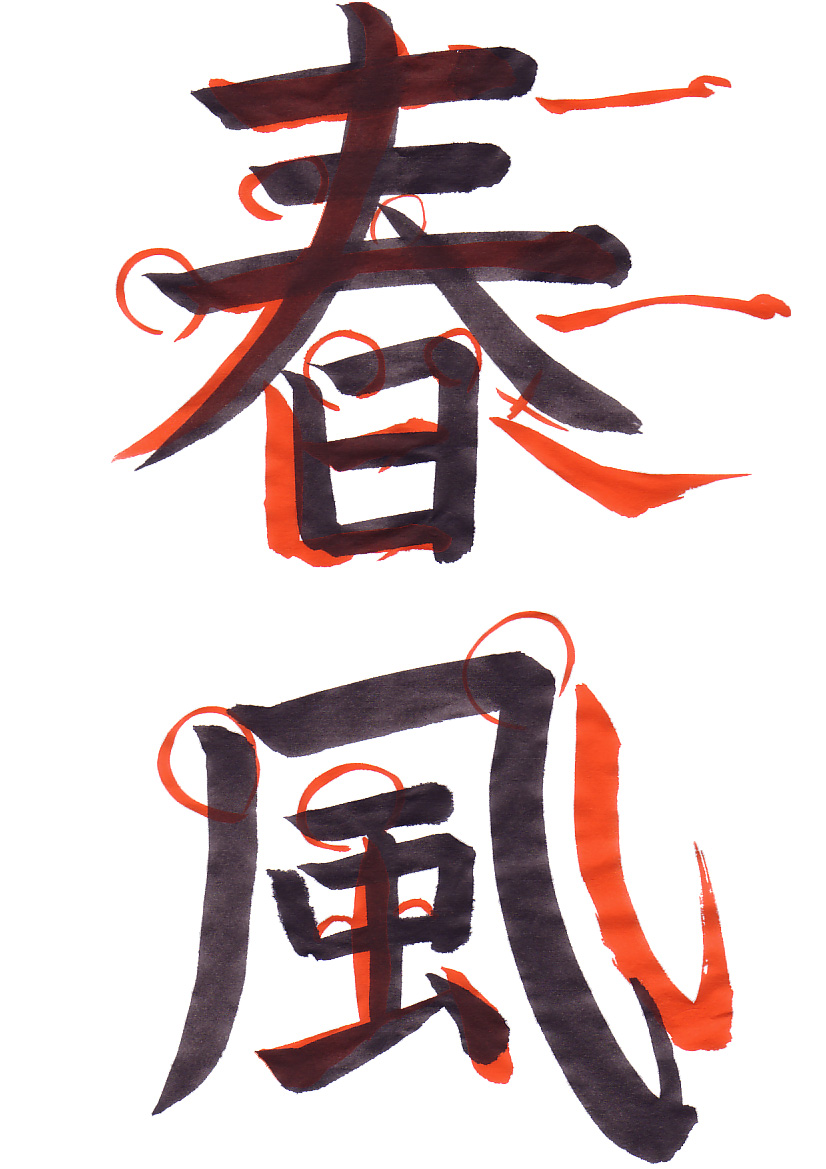
- 0:07 The first yokoga is slightly long.
- 0:08 The ending is not quite right.
- 0:13 The line should be angled slightly upward.
- 0:13 At the end of the line, the brush is brought up to the edge of the line and pressed down.
- 0:14 The brush is then brought down and around to fill out the edge.
- 0:14 Then the brush is brought back to the left.
- 0:23 The start of the second yokoga is fine.
- 0:28 For the third yokoga this really should be a convex shape.
- 0:28 At the end of the line, the brush is brought up to the edge of the line and pressed down.
- 0:29 The brush is then brought down and around to fill out the edge.
- 0:29 The pressure on the brush is gradually released as the brush approaches the middle of the line and gradually increased as one moves to the right of the middle of the line.
- 0:39 The line should also be shorter. Again, at the end of the line the brush is brought up to the edge and pressed down on. Then the pressure on the brush is released.
- 0:41 And the brush is brought down and around to fill out the edge.
- 0:41 And the end is finished off moving the brush to the left and off the paper.
- 0:50 This shows the results so far.
- 0:58 The migibarai does not have a good ending. Apply the brush to the paper at a 45 degree angle but instead of stopping or hesitating as in other strokes, bring the brush down and to the right.
- 1:01 As you approach the bottom of the stroke gradually press down on the brush. At the bottom of the stroke pause briefly. Reposition the brush so the thick part of the brush is facing to the right.
- 1:02 Then pull the brush slowly to the right while lifting it off the paper giving a nice triangular taper to the stroke.
- 1:14 For the tatega, apply the brush to the paper at a 45 degree angle. Press down gently on the brush and come back up a little. The brush is then rotated clockwise so the thick part of the curve of the brush is facing downward. The brush is also tilted so the tip of the brush is well below (towards the bottom of the page) the end of the brush. Then push the brush straight down using your arm to draw the line.
- 1:14 To end the stroke, the brush is lifted a bit and reapplied very briefly.
- 1:15 Finally the brush is lifted in an upward stroke (towards the top of the paper) and off of the paper. This is performed in a large motion.
- 1:30 The start of the tensetsu is fine. The yokoga should be angled slightly upward.
- 1:37 The start of the hidaribarai of the kaze character is fine.
- 1:43 The corner of the tensetsu is fine. The ending, however, needs improvement. The start of the horizontal component is down and slightly to the left.
- 1:44 Pause briefly at the end of the curved line.
- 1:46 Rotate the brush counterclockwise so the thick part of the brush is facing to the right and draw a short 45 degree angle line. Then reposition the brush again for the hane stroke.
- 1:48 The hane stroke is a quick and large movement.
- 1:56 The inner yokoga is fine. The tatega should bisect the square.
- 2:00 The migihane needs to come over to the left a little.
- 2:06 And the final ten needs to be repositioned.
Another student’s 春風
The student’s video, without corrections
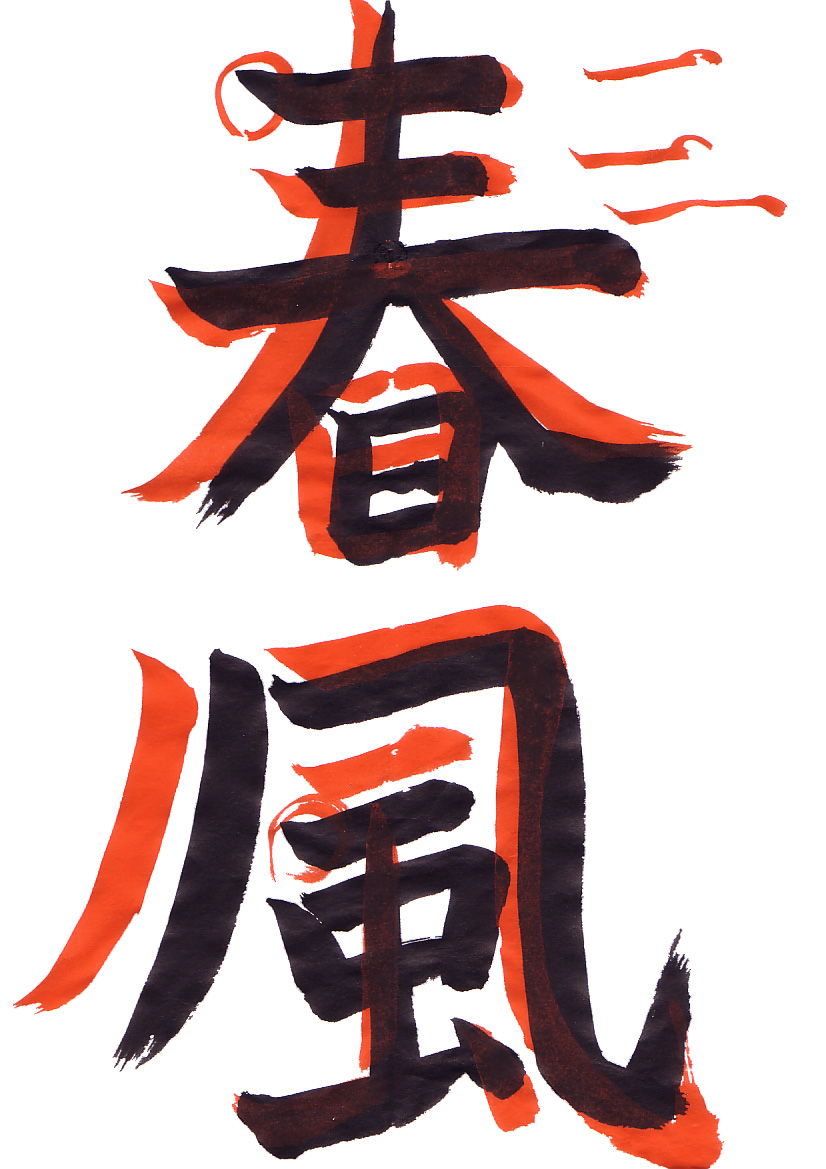
- 0:33 The yokoga has the same basic mistakes as we discussed with Student 1.
- 0:38 The start of the hidaribarai is not correct. Apply the brush at a 45 degree angle.
- 0:39 Press down gently on the brush and come back up. Then rotate the brush so the thick end of the curve is in the direction of the stroke.
- 0:40 Using consistent pressure and using the entire arm to draw the line, bring the brush to the left and down in a nice smooth arc.
- 0:41 As you approach the bottom of the stroke gradually bring the brush off the paper giving a nice taper to the line.
- 0:44 For the migibarai, apply the brush to the paper at a 45 degree angle but instead of stopping or hesitating as in other strokes, bring the brush down and to the right.
- 0:46 As you approach the bottom of the stroke gradually press down on the brush.
- 0:47 At the bottom of the stroke pause briefly. Reposition the brush so the thick part of the brush is facing to the right.
- 0:48 Then pull the brush slowly to the right while lifting it off the paper giving a nice triangular taper to the stroke.
- 0:58 The whole box area needs to be repositioned and the basic lines improved.
- 1:03 The hidaribarai stroke does not start nicely. Apply the brush to the paper at a 45 degree angle.
- 1:04 Press down gently on the brush and come back up. Then rotate the brush so the thick end of the curve is in the direction of the stroke.
- 1:05 Using consistent pressure and using the entire arm to draw the line, bring the brush to the left and down in a nice smooth arc.
- 1:06 As you approach the bottom of the stroke gradually bring the brush off the paper giving a nice taper to the line.
- 1:09 For the horizontal component of the tensetsu, apply the brush to the paper at a 45 degree angle. Press down gently on the brush and release the pressure.
- 1:09 Rotate the brush counterclockwise so the thick part of the brush is facing to the right and slightly upward. The brush is tilted so that the tip of the brush is to the right of the end of the brush. Push the brush to the right using the whole arm and even pressure.
- 1:10 At the end of the horizontal stroke, pause and rotate the brush clockwise a bit.
- 1:10 Draw a short 45 degree angle line down and to the right. Note how the hand position is changed to bring the thick end of the brush in line with the direction of the line to be drawn.
- 1:12 Use the entire arm to draw the vertical component that is angled slightly to the left.
- 1:13 Then begin the curve to the right.
- 1:13 At the end of the curve pause briefly to reposition the brush by rotating it counterclockwise.
- 1:14 Draw a very short 45 degree angle line.
- 1:16 Rotate the brush again to bring the thick part of the brush up and to the right.
- 1:17 Finish with a quick motioned hane stroke.
- 1:23 The internal part needs to be moved up to provide nice balance.
- 1:34 Student 2 still needs to improve basic lines and strokes. Returning to lessons 2 and 3 and focusing on basic lines and strokes would be a good idea.
Vocabulary
| Romaji | Kana | Kanji | English | Audio |
|---|---|---|---|---|
| hane | はね | 撥ね | Flick Stroke | audio |
| harukaze | はるかぜ | 春風 | Spring Wind | audio |
| hidaribarai | ひだりばらい | 左払い | Left Pullout Stroke | audio |
| migibarai | みぎばらい | 右払い | Right Pullout Stroke | audio |
| migihane | みぎはね | 右撥ね | Right Flick Stroke | audio |
| tatega | たてが | 縦画 | Vertical Stroke | audio |
| tensetsu | てんせつ | 転折 | Continued Lines | audio |
| yokoga | よこが | 横画 | Horizontal Line | audio |