
Lesson 20
天地 tenchi · Heaven and Earth
1. The character
tenchi 天地 means Heaven and combines the character for sky 天 ten and ground 地 chi. tenchi also means "heaven and earth" and "the universe."
tenchi (Heaven and Earth) 天地 — sensei video
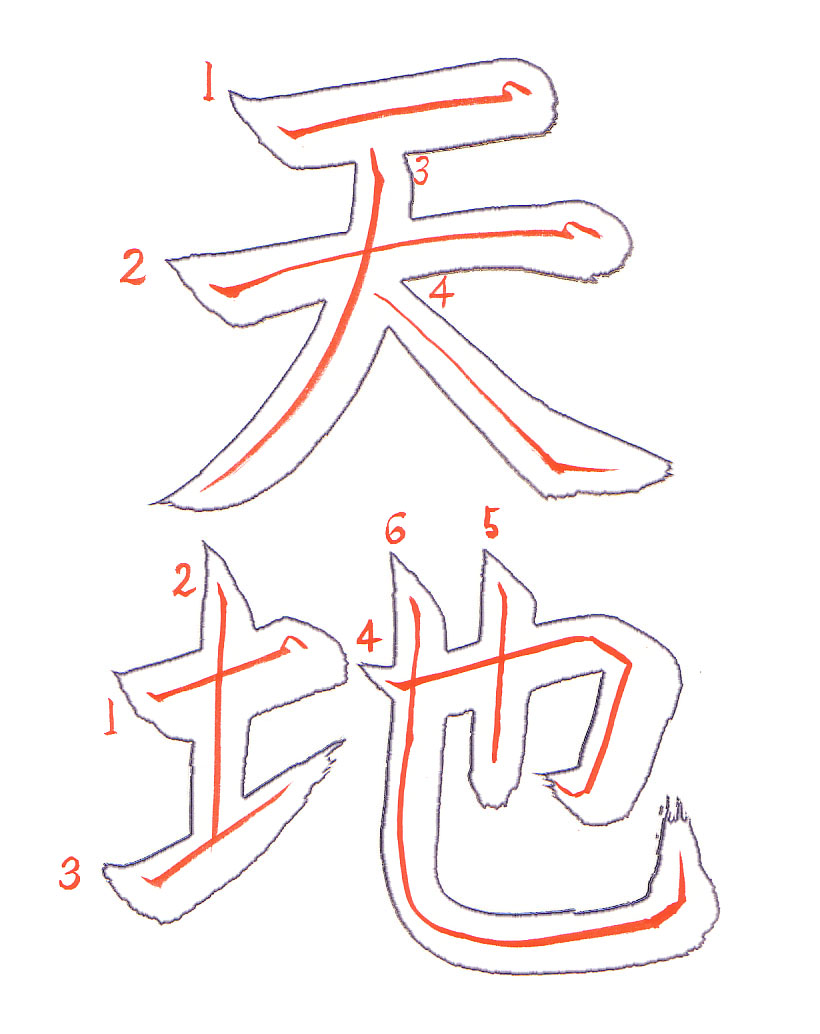
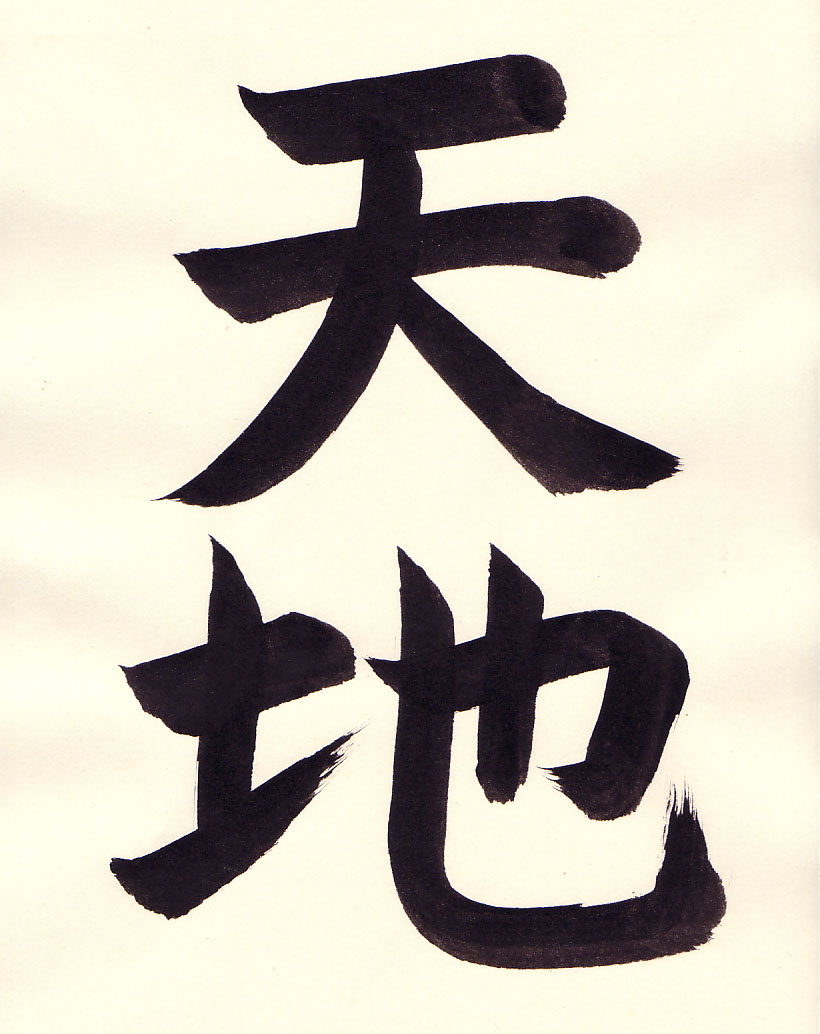
- 0:07 For the first yokoga, apply the brush to the paper at a 45 degree angle.
- 0:08 Press down gently on the brush and release the pressure.
- 0:08 Rotate the brush counterclockwise so the thick part of the brush is facing to the right and slightly upward.
- 0:09 The brush is tilted so that the tip of the brush is to the right of the end of the brush. Push the brush to the right using the whole arm and even pressure.
- 0:10 At the end of the line, raise the brush a bit and then again gently press down. This will slightly fill out the top part of the line.
- 0:11 Then bring the brush down and this will fill out the bottom part of the line.
- 0:12 After finishing the bottom part of the end of the line the stroke is finished by bringing the brush off of the paper to the left.
- 0:16 For the second yokoga, apply the brush to the paper at a 45 degree angle.
- 0:16 Press down gently on the brush and release the pressure.
- 0:18 Rotate the brush counterclockwise so the thick part of the brush is facing to the right and slightly upward. The brush is tilted so that the tip of the brush is to the right of the end of the brush. Push the brush to the right using the whole arm.
- 0:19 Note that pressure is varied and the line is slightly curved. At the end of the line, raise the brush a bit and then again gently press down. This will slightly fill out the top part of the line.
- 0:20 Then bring the brush down and this will fill out the bottom part of the line.
- 0:21 After finishing the bottom part of the end of the line the stroke is finished by bringing the brush off of the paper to the left.
- 0:25 Start the hidaribarai in the middle of the first yokoga by applying the brush to the paper at a 45 degree angle.
- 0:26 Press down gently on the brush and come back up.
- 0:27 Then rotate the brush so the thick end of the curve is in the direction of the stroke.
- 0:28 Using consistent pressure and using the entire arm to draw the line, bring the brush to the left and down in a nice smooth arc.
- 0:29 As you approach the bottom of the stroke gradually bring the brush off the paper giving a nice taper to the line.
- 0:34 Start the migibarai within the hidaribarai and note that this is just below the corner. Apply the brush at a 45 degree angle.
- 0:36 Unlike the other strokes do not pause the brush after applying to the paper and do not press down. Rather while gradually adding pressure bring the brush down and to the right.
- 0:36 At the bottom of the stroke pause briefly and rotate the brush so the thick part of the brush faces to the right.
- 0:38 Then pull the brush slowly to the right while lifting it off the paper giving a nice triangular taper to the stroke.
- 0:44 Apply the brush at a 45 degree angle.
- 0:44 Press down slightly.
- 0:46 Note the yokoga for the chi character is slanted slightly upward. At the end of the yokoga, at the end of the line, raise the brush a bit and increase the outer width of the end of the line.
- 0:47 Then in an arcing stroke, increase the lower width of the line.
- 0:47 Finish the stroke by bringing the brush to the left and off the paper.
- 0:50 For the tatega apply the brush at a 45 degree angle.
- 0:51 Press down gently on the brush and come back up a little. The brush is then rotated clockwise so the thick part of the curve of the brush is facing downward. The brush is also tilted so the tip of the brush is well below (towards the bottom of the page) the end of the brush.
- 0:53 Then push the brush straight down using your arm to draw the line. At the end of the line press down gently on the brush to give a crisp bottom to the line.
- 0:54 The brush is brought up and off the page.
- 0:56 For the migihane, apply the brush to the paper at a 45 degree angle.
- 0:56 Press down gently on the brush and come back up a bit.
- 0:57 The brush is then rotated so that the thick end of the bend of the bristles is facing to the right and up. The brush is also tilted to the left so the tip of the brush is ahead of the end of the brush.
- 0:58 Then in a quick motion bring the brush up and to the right and off the paper.
- 1:02 For the tensetsu line, apply the brush at a 45 degree angle.
- 1:02 Press down gently on the brush and release the pressure.
- 1:03 Rotate the brush counterclockwise so the thick part of the brush is facing to the right and slightly upward. The brush is tilted so that the tip of the brush is to the right of the end of the brush.
- 1:04 At the end of the horizontal stroke, rotate the brush clockwise.
- 1:05 Draw a short 45 degree angle line that goes down and to the right.
- 1:06 The thick part of the curve of the brush is facing downward. The brush is also tilted so the tip of the brush is well below (towards the bottom of the page) the end of the brush. Then push the brush straight down using your arm to draw the line.
- 1:07 At the bottom of the tensetsu, rotate the brush clockwise and draw another slight 45 degree angle line.
- 1:08 Finally the brush is rotated once again so the thick part of the brush is facing up and to the left.
- 1:09 In a large quick hane stroke bring the brush up and off the paper.
- 1:14 For the second tatega apply the brush at a 45 degree angle.
- 1:16 Press down gently on the brush and come back up a little.
- 1:18 The brush is then rotated clockwise so the thick part of the curve of the brush is facing downward. The brush is also tilted so the tip of the brush is well below (towards the bottom of the page) the end of the brush. Then push the brush straight down using your arm to draw the line.
- 1:19 At the end of the line apply gentle pressure to the brush to give a clean bottom to the line and then bring the brush up and off the paper.
- 1:28 For the curved line, apply the brush at a 45 degree angle. Then press down gently on the brush and come back up a little.
- 1:30 The brush is then rotated clockwise so the thick part of the curve of the brush is facing downward. The brush is also tilted so the tip of the brush is well below (towards the bottom of the page) the end of the brush. Then push the brush straight down using your arm to draw the line.
- 1:32 At the bottom create a sharp 90 degree curve.
- 1:34 At the end of the line pause briefly and rotate the brush counterclockwise so the thick part of the brush is facing upward and to the right. Draw a slight 45 degree angle.
- 1:35 Rotate the brush counterclockwise to bring the thick part of the brush facing upward.
- 1:36 Finish the line using a large and quick hane stroke.
2. How students did
A student’s 天地
The student’s video, without corrections
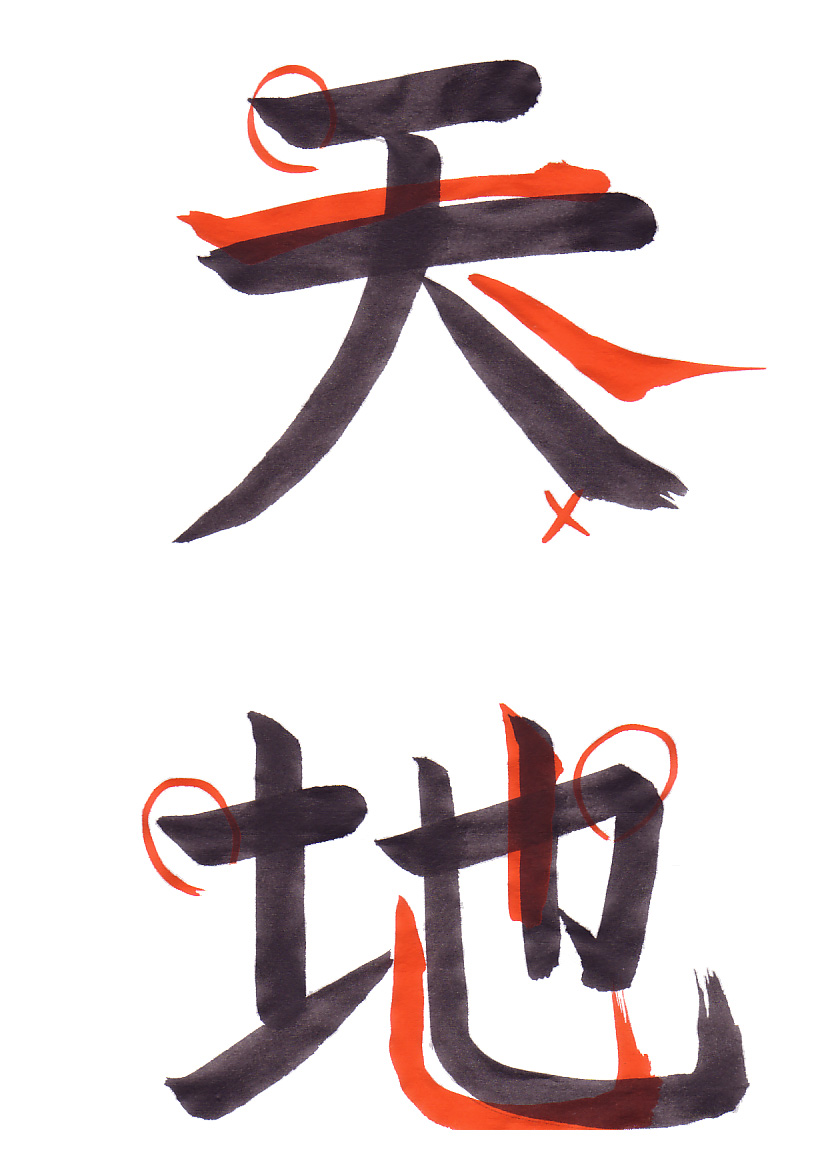
- 0:03 The start of the first yokoga is fine.
- 0:05 The second yokoga can have a more defined start.
- 0:07 Use the whole arm but varying pressure on the brush to give a variable width to the line.
- 0:11 The line should be angled slightly upward and should be slightly curved.
- 0:18 The migibarai was pulled through without readjusting the brush.
- 0:20 At the bottom of the stroke pause briefly.
- 0:22 Then rotate the brush counterclockwise so the thick part of the brush is facing to the right.
- 0:24 Draw the brush to the right and off the paper in a way that gives a nice triangular end to the stroke.
- 0:27 This yokoga starts fine.
- 0:33 The corner on the tensetsu is fine.
- 0:40 The second tatega is too long.
- 0:46 The curve should be sharper. Get the brush close to the bottom of the stroke before beginning the curve.
- 0:47 The brush is being tilted to draw the curve.
- 0:49 At the end of the line pause and rotate the brush counterclockwise so the thick part of the brush is to the upper right.
- 0:51 Draw a short 45 degree angle and then rotate the brush further so the thick part of the brush is facing towards the top of the page.
- 0:53 In a large hane stroke bring the brush up and off the paper in a quick stroke.
Another student’s 天地
The student’s video, without corrections
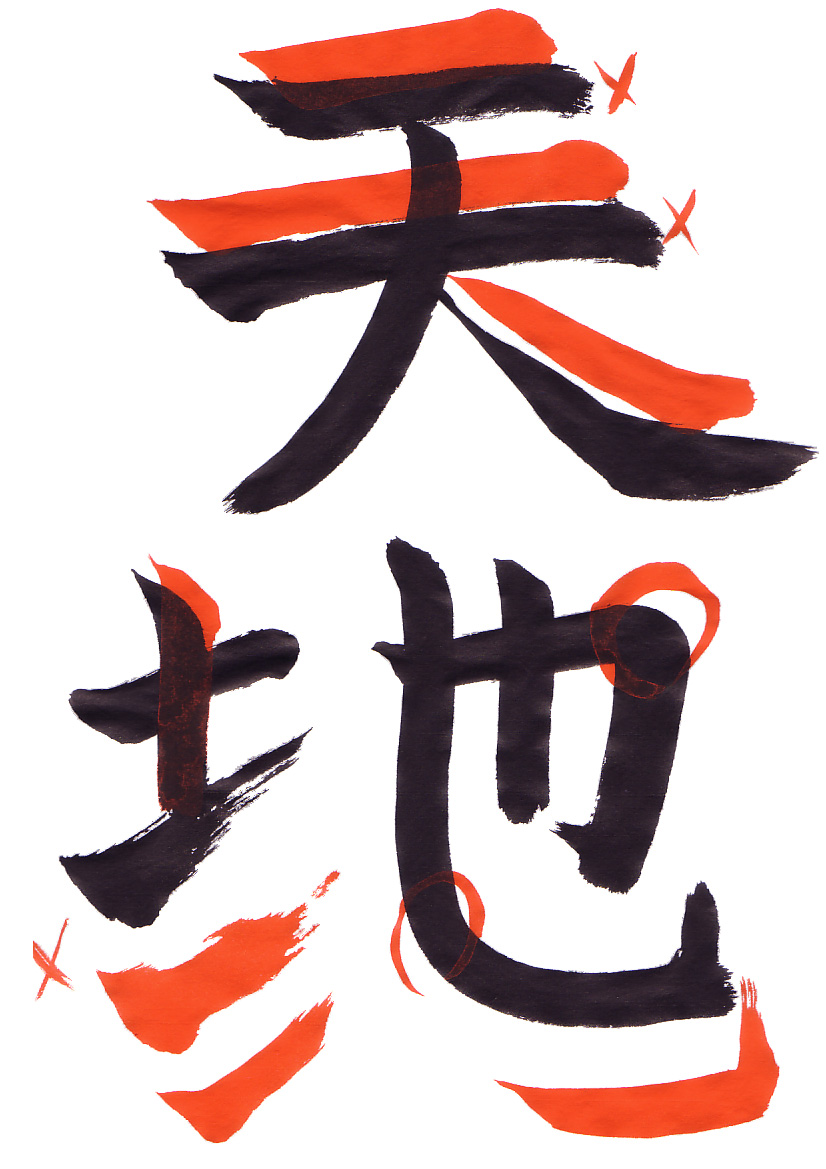
- 0:03 The two yokoga start fine, but the endings need work.
- 0:04 At the end of the line, raise the brush a bit and the tip of the brush will create a slight bump on the top of the line.
- 0:04 Then bring the brush down a bit to fill out the bottom part of the line.
- 0:04 The ending is finished by bringing the brush off the paper to the left.
- 0:09 The end of the second line droops which is not a nice effect.
- 0:14 Both the yokoga should be higher on the character.
- 0:20 The migibarai is not well formed. Pressure is gradually applied so the line gets thick as one moves down, but this should not be extreme.
- 0:21 At the end of the line pause and rotate the brush counterclockwise so the thick end of the brush is facing to the right.
- 0:23 Finish the stroke with a deliberate pull to the right.
- 0:27 The first tatega is not straight. Apply the brush at a 45 degree angle.
- 0:27 Press down slightly on the brush and release the pressure a bit.
- 0:29 The brush is then rotated clockwise so the thick part of the curve of the brush is facing downward. The brush is also tilted so the tip of the brush is well below (towards the bottom of the page) the end of the brush. Use the entire arm to draw the line and even pressure. This will give both a straight line and a line with even width.
- 0:29 The stroke is finished by bringing the brush up and off the paper.
- 0:32 The migihane was drawn with the side of the brush. This is not a nice effect. The brush is applied at a 45 degree angle.
- 0:33 But without changing the brush position the brush is brought up and to the right drawing with the side of the brush.
- 0:34 This has a bad kasure effect.
- 0:36 Do not use the side of the brush to draw lines.
- 0:38 To begin the migihane apply the brush to the paper at a 45 degree angle.
- 0:38 Press down gently on the brush and come back up a bit.
- 0:39 The brush is then rotated so that the thick end of the bend of the bristles is facing to the right and up. The brush is also tilted to the left so the tip of the brush is ahead of the end of the brush.
- 0:40 Then in a quick motion bring the brush up and to the right and off the paper.
- 0:41 This is a large, quick stroke.
- 0:47 The curve is fine. The bulge at the end of the line should not be there.
- 0:51 At the end of the line pause briefly and rotate the brush counterclockwise so the thick part of the brush is facing upward and to the right. Draw a slight 45 degree angle.
- 0:52 Rotate the brush counterclockwise to bring the thick part of the brush facing upward. If you look closely you can see the bristles bending.
- 0:53 Finish the line using a large and quick hane stroke.
Vocabulary
| Romaji | Kana | Kanji | English | Audio |
|---|---|---|---|---|
| hane | はね | 撥ね | Flick Stroke | audio |
| hidaribarai | ひだりばらい | 左払い | Left Pullout Stroke | audio |
| migibarai | みぎばらい | 右払い | Right Pullout Stroke | audio |
| migihane | みぎはね | 右撥ね | Right Flick Stroke | audio |
| ro | ろ | 露 | Dewdrop Vertical Line | audio |
| tatega | たてが | 縦画 | Vertical Stroke | audio |
| tenchi | てんち | 天地 | Heaven | audio |
| tensetsu | てんせつ | 転折 | Continued Lines | audio |