
Lesson 9
花 hana · Flower
1. The character
hana 花 along with tsuki 月 are commonly seen in Japanese poetry and calligraphy. A Japanese term describing the beauties of the seasons is 雪月花 which is read setsugekka and literally translates to "snow, moon, and flower." This term is used to depict the most beautiful aspects of the seasons winter, autumn, and spring respectively.
hana (Flower) 花 — sensei video
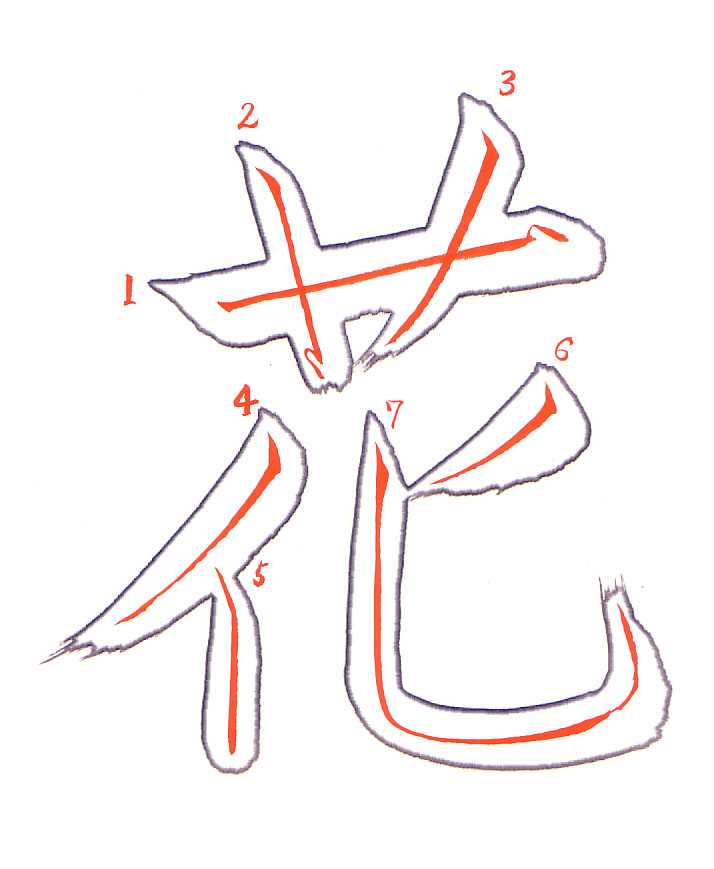
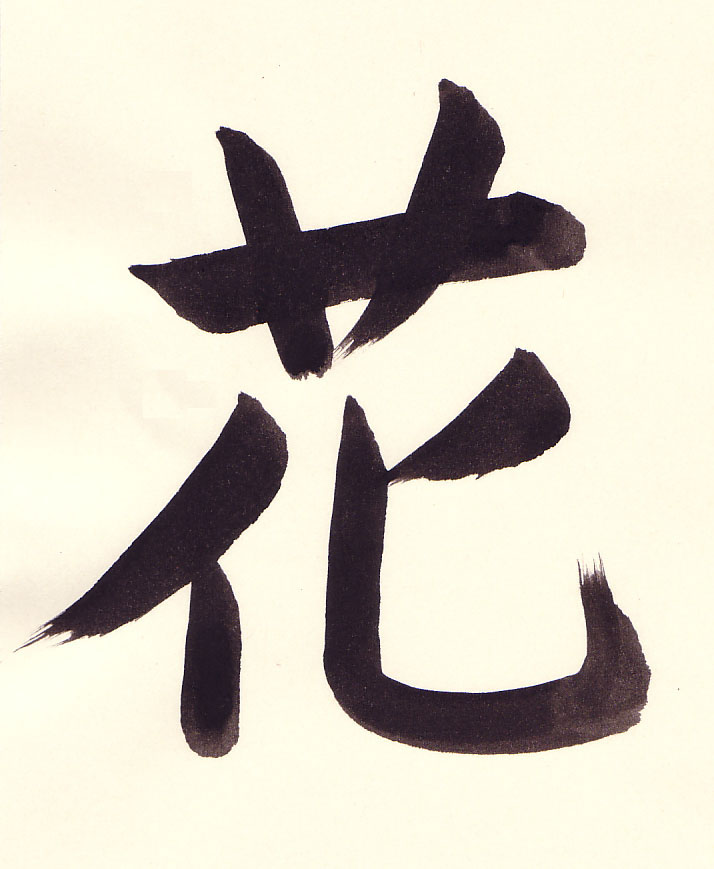
- 0:06 For the yokoga apply the brush to the paper at a 45 degree angle. Note that the tip of the brush is to the left of the hand.
- 0:06 Shift the brush so the thick part of the brush (caused by the curving of the brush) is to the right and slightly upward - this is in the direction that the line is to be drawn. Note that the tip of the brush has been moved to the right and is to the right of the end of the brush.
- 0:07 The brush is now in a good position to draw the rest of the line. Using even pressure and the entire arm, draw the line.
- 0:08 Once the yokoga is begun, the entire arm is used to draw the line.
- 0:08 To finish the line the brush is brought slightly upward.
- 0:09 Then very slightly downward.
- 0:10 And the line is finished by moving the brush off of the paper and to the left.
- 0:12 Start the tatega by applying the brush at a 45 degree angle.
- 0:13 Again the brush is rotated so the thick part of the brush is in the direction of the line to be drawn which is down and to the right.
- 0:14 Draw the line using even pressure and the entire arm to move the brush.
- 0:15 To finish the stroke bring the brush up off the paper and upwards towards the top of the paper.
- 0:19 The second vertical line is a hidaribarai. The brush is applied at a 45 degree angle. Then very briefly press down on the brush while rotating the brush so the thick part of the brush faces down and to the left.
- 0:20 In a large deliberate motion finish off the stroke by bringing the brush down and to the left while also gradually removing the brush from the paper.
- 0:24 The fourth line is also a hidaribarai.
- 0:25 The brush is now properly positioned with the thick part of the brush facing down and to the left.
- 0:26 In a large deliberate motion finish off the stroke by bringing the brush down and to the left while also gradually removing the brush from the paper.
- 0:29 The tatega is started with the tip of the brush in the above hidaribarai. When the brush is pressed and drawn down, there is a nice angle at the top of the line. The tatega is not of even width in the beginning which would happen if the line were started further up within the hidaribarai.
- 0:32 The brush has been rotated so the thick part of the brush is facing towards the bottom of the page.
- 0:33 This tatega is the ro style and so the end stroke is to bring the brush up towards the top of the paper and off.
- 0:35 The hidarihane is started like other strokes with the brush applied at a 45 degree angle. The brush will be rotated so the thick part of the brush is towards the bottom left of the paper.
- 0:37 And in a quick and large motion the brush is brought off the page.
- 0:40 To start the final line apply the brush at a 45 degree angle.
- 0:41 Note again the change in brush position so that now the tip of the brush is well in front of the end of the brush.
- 0:43 Draw the curve using the entire arm.
- 0:44 At the end of the curve the brush is repositioned to draw a slight 45 degree angle line that will be up and to the right.
- 0:44 Draw the slight 45 degree angle line and reposition the brush so the thick part of the brush is upward.
- 0:46 Now in a hane stroke bring the brush up and off of the paper.
- 0:46 The hane stroke is quick with a large motion.
2. How students did
A student’s 花
The student’s video, without corrections
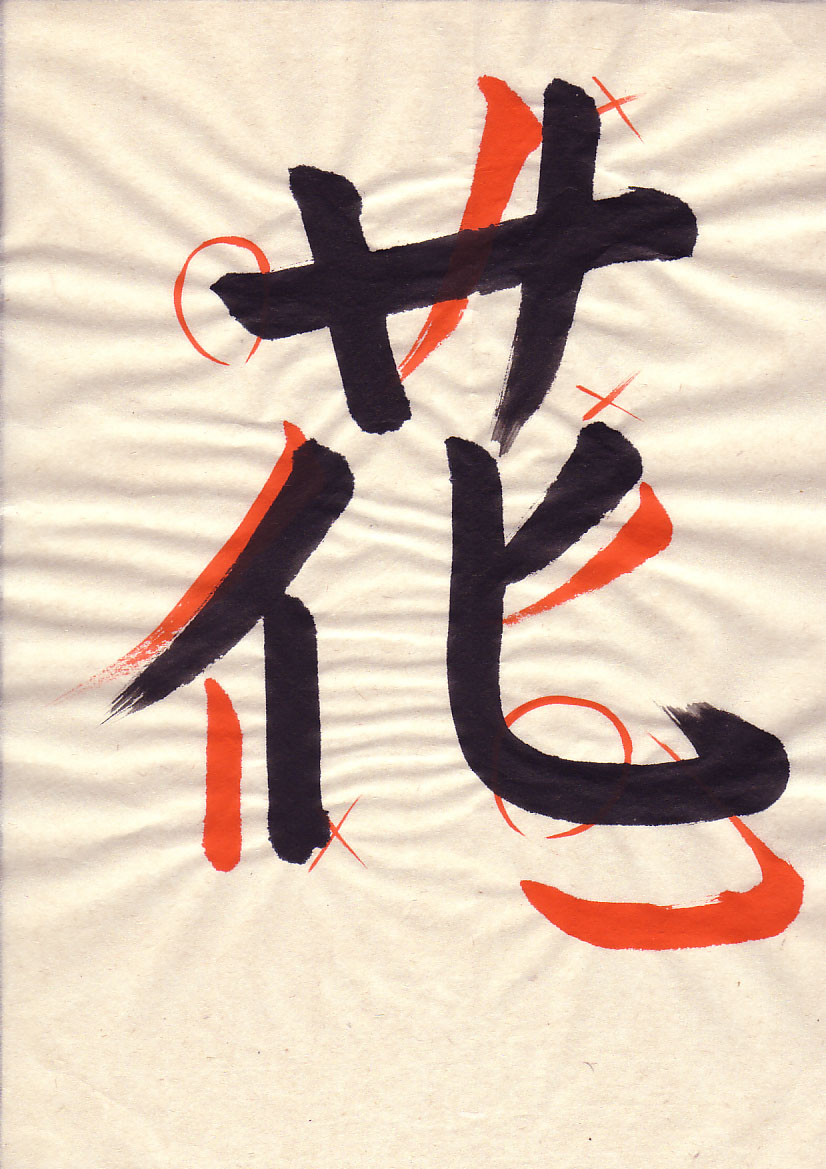
- 0:03 The yokoga starts fine.
- 0:08 For the hidaribarai the brush is applied at a 45 degree angle.
- 0:09 Press down slightly on the brush and release.
- 0:10 The brush is then rotated so the thick part of the curve of the brush faces the direction of the stroke which is down and to the left.
- 0:13 In a large and deliberate motion bring the brush towards the bottom of the page and to the left while also bringing the brush up and off the paper. This gives a nice sword shape to the end of the line.
- 0:19 The student did not start the second hidaribarai stroke with the brush at a 45 degree angle. Apply the brush at a 45 degree angle and then press down slightly on the brush and release the pressure.
- 0:21 The brush is then repositioned so the thick part of the brush is facing down and to the left.
- 0:21 Note that the hand position has not changed and the entire arm is being used to draw the line.
- 0:22 The brush is brought up and off the paper.
- 0:26 The main problem with the vertical ro is the ending. The bulge should not be there.
- 0:28 At the end of the ro, the brush is brought up towards the top of the page and off the page.
- 0:33 Here we can see the sensei's end of the ro is not overly rounded.
- 0:37 For the hidarihane, apply the brush at a 45 degree angle.
- 0:38 Press down briefly and reposition the brush so the thick part of the brush is facing down and to the left.
- 0:39 This is a good picture showing how the thick part of the brush is facing down and to the left in the direction of the line being drawn.
- 0:40 Note the more triangular form of the sensei's stroke compared to the student's stroke.
- 0:51 The curve here is fine.
- 0:53 The only issue is that the 45 degree angle at the end of the stroke is missing. At the end of the line pause very briefly and reposition the brush so the thick part is facing up and to the right.
- 0:53 Draw a very slight 45 degree angle line.
- 0:55 Then use a hane stroke that is up and to the left bringing the brush off the paper in a quick and large stroke.
- 0:55 Again notice the almost exaggerated arm motion that is required for the hane stroke.
- 1:00 Overall student 1 is making nice progress. Here we are focusing on the starting and ending of lines and in getting an even width to the lines.
NOTE: One thing to note in looking at the student 1 critique close-up above is that the student's character has excessive bleeding of the ink. The edges of the lines are fuzzy. This is caused by the ink bleeding into the surrounding area. When you see this in your own work, pull some of the ink out of the umi and continue grinding it. Thickening the ink will prevent this bleeding.
Another student’s 花
The student’s video, without corrections
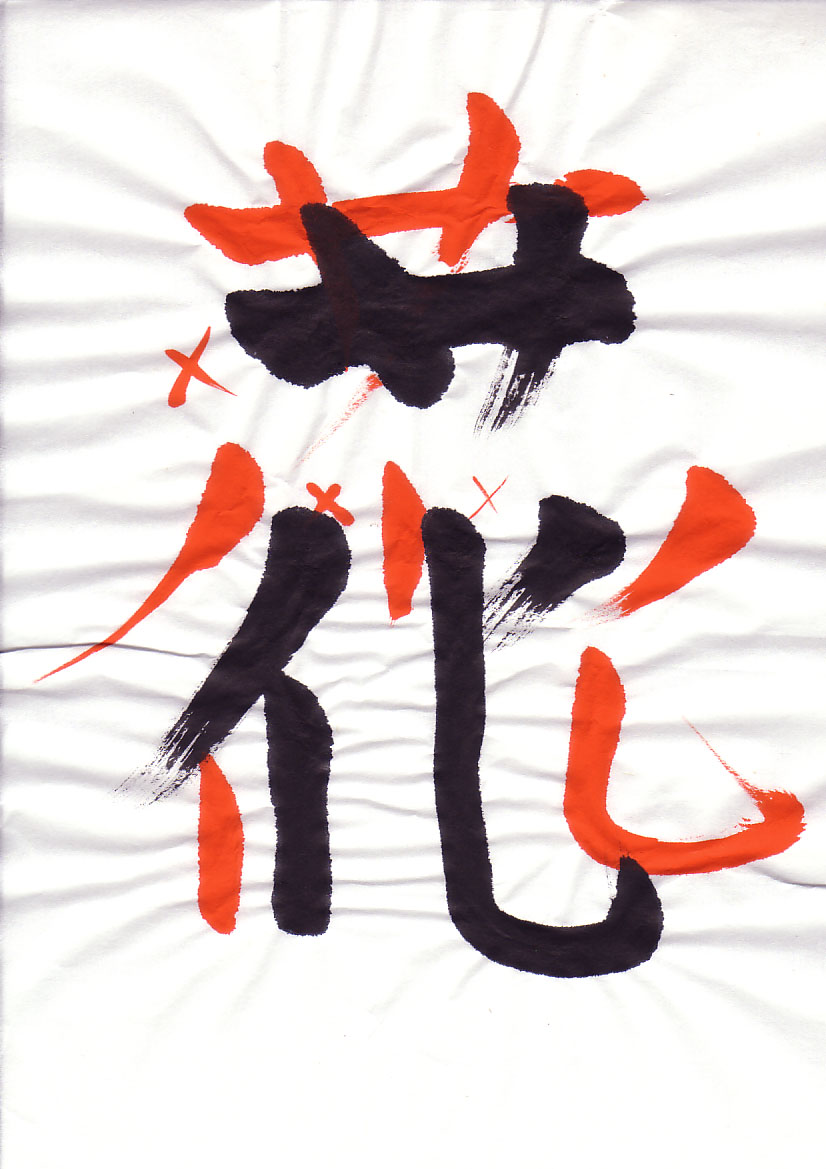
- 0:04 The yokoga does not have a nice start and shape.
- 0:05 Apply the brush at a 45 degree angle.
- 0:06 Rotate the brush so that the thick end of the brush is facing to the right and slightly upward.
- 0:10 The yokoga should be straight and angled slightly upward and of an even width.
- 0:16 For the first tatega, the student's sample is angled too much and should be more vertical.
- 0:21 The hidarihane has several issues. The first being that the line was not started by applying the brush at a 45 degree angle. The second is that the brush was not repositioned to use the thick part of the brush. Rather, the side of the brush was used. Repositioning the brush to use the thick part of the curve is very important.
- 0:29 The hidaribarai was not started and finished nicely. Again apply the brush at a 45 degree angle, press down slightly, reposition the brush so the thick part of the brush is facing down and to the left. Then in a larger deliberate stroke and with a large motion bring the brush down and left while bringing the brush off the paper.
- 0:37 The start of the curved line is not crisp.
- 0:39 At the end of the curved line, be sure to reposition the brush to draw a slight 45 degree angle line that is up and to the right.
- 0:42 From the 45 degree angle line the brush is once again repositioned to begin the hane stroke which is quick and a large motion.
- 0:47 The second hane stroke should start with the brush being applied at a 45 degree angle.
- 0:48 Push down on the brush and rotate the brush so the thick end of the brush is facing down and to the left. The stroke is finished with a quick large motion bringing the brush down and off the paper. If there is not a nice tip to the brush, the brush may have to also be rotated during the stroke to give a nice sword shape to the end of the stroke.
- 0:50 This shows the nice sword shape to the hane stroke.
- 0:52 Here we go back to the start of the large curved line. Apply the brush at a 45 degree angle.
- 0:53 Press down slightly and rotate the brush so that the thick part of the brush is facing down towards the bottom of the page.
- 0:59 Student 2 needs to further practice the basic lines and strokes. A combination of both more practice and using less absorbent paper will yield good results.
NOTE: The excessive bleeding of the ink in this sample is due mainly to the paper being used. This student would be advised to try another paper that will hold the ink better. Another reason to suspect that the paper is at fault is that the red ink used in the Student 1 Critique is the same as used in this critique. There was little bleeding in the first example, but there is significant bleeding in this example. This means Student 2 should find a more suitable paper.
Write on the Smooth Side of the Paper
Also use this moment to check your work and make sure that you are writing on the smooth side of the paper. If you look closely or feel the paper you will note that one side is smooth and one side is a bit rough. Writing is done on the smooth side of the paper.
Vocabulary
| Romaji | Kana | Kanji | English | Audio |
|---|---|---|---|---|
| hana | はな | 花 | Flower | audio |
| hane | はね | 撥ね | Flick Stroke | audio |
| harai | はらい | 払い | Pullout Stroke | audio |
| hidaribarai | ひだりばらい | 左払い | Left Pullout Stroke | audio |
| hidarihane | ひだりはね | 左はね | Left Flick Stroke | audio |
| tatega | たてが | 縦画 | Vertical Stroke | audio |
| yokoga | よこが | 横画 | Horizontal Line | audio |