
Lesson 10
岩 iwa · Rock
1. The character
iwa means rock and also means crag. The character 岩 is composed of two parts with the top being mountain 山 or yama and the bottom being stone 石 or ishi. Indeed a crag is a mountain stone.
There are two tensetsu in this character and now is a good time to work on this stroke in particular. Remember that the tensetsu is done in three parts with a small 45 degree angle line connecting the horizontal and vertical components.
Also be sure that you have practiced the stroke order many times. You will see that student 2 has not done this and made a mistake in the order. The overall balance of the character is obtained one stroke at a time with the next line depending on the previous line. The order of the strokes is important and should become second nature to you.
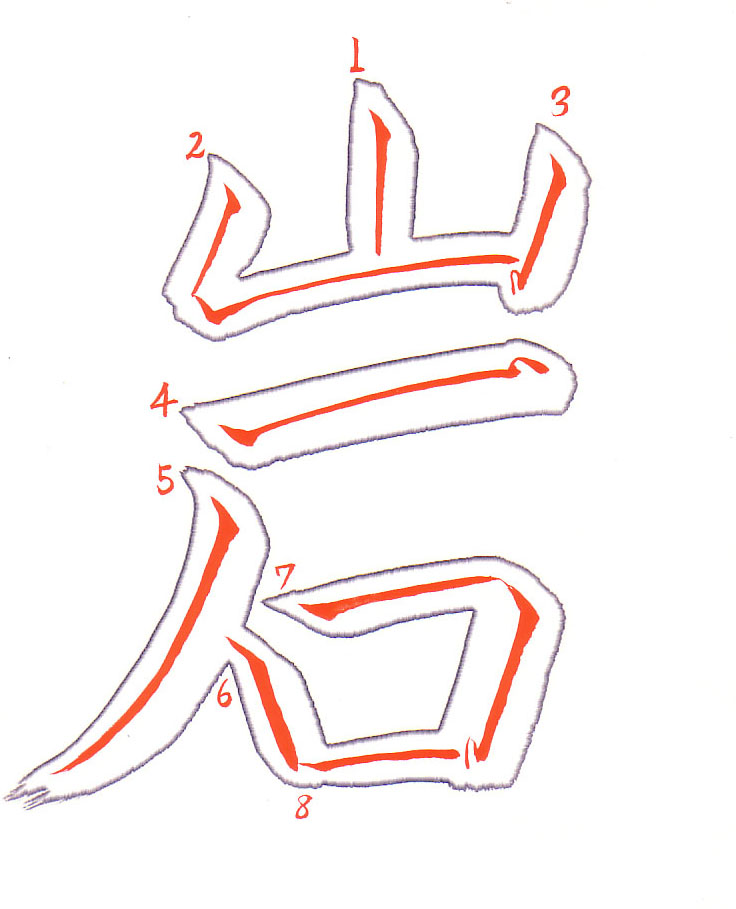
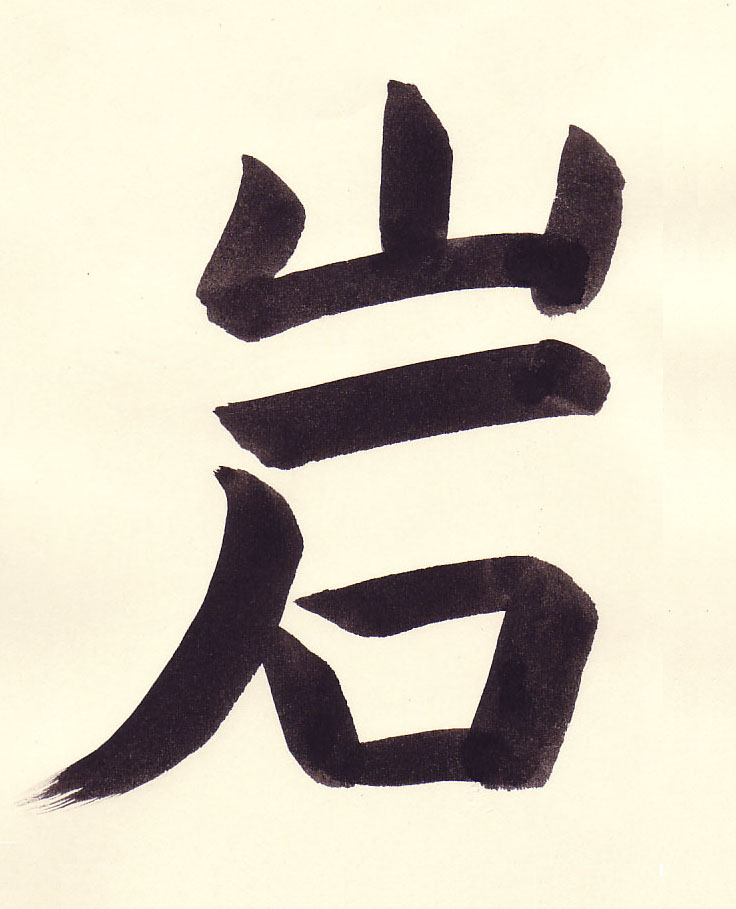
- 0:09 The first line is a ro style tatega. The brush is applied to the paper at a 45 degree angle.
- 0:11 Press down on the brush and then rotate the brush clockwise to bring the thick end of the brush down towards the bottom of the page.
- 0:12 Pause at the end of the line.
- 0:12 At the end of the stroke, the brush is lifted a bit and reapplied in a brief stop. Finally the brush is lifted in an upward stroke (towards the top of the paper) and off of the paper.
- 0:15 Begin the tensetsu by applying the brush at a 45 degree angle.
- 0:16 Press down on the brush and then rotate the brush clockwise so that the thick part of the brush is facing towards the bottom of the paper and slightly to the left.
- 0:17 Draw the vertical component using the entire arm.
- 0:18 At the end of the line rotate the brush counterclockwise to draw a short 45 degree angle line.
- 0:19 The horizontal component is slanted slightly upward.
- 0:21 The tensetsu is ended by bringing the brush up and off the paper.
- 0:22 For the tatega, apply the brush at a 45 degree angle.
- 0:25 Note that this line slants slightly inward. It is not curved, so before beginning the line the brush is positioned so the thick part of the brush is facing towards the bottom of the page and slightly to the left.
- 0:25 The line is finished by bringing the brush up and off the paper.
- 0:29 For the yokoga apply the brush at a 45 degree angle. Note: The symbol above means mountain and is read yama.
- 0:30 Press down slightly and release. Then align the thick end of the brush to face to the right and slightly upward.
- 0:31 Keeping even pressure and using the arm, draw the line. To end the line, the brush is lifted upward (towards the top of the paper) and pressure is slightly released. Then the brush is moved to a 45 degree angle and stopped.
- 0:33 Note that there is not a large space between the two horizontal components. Both student samples miss this and leave too much blank space here.
- 0:36 Apply the brush to the paper at a 45 degree angle. Press down gently on the brush and come back up.
- 0:37 Then rotate the brush so the thick end of the curve is in the direction of the stroke. Then bring the brush to the left and down.
- 0:39 As you approach the bottom of the stroke gradually bring the brush off the paper. This is a gentle stroke like a wave moving across the ocean and it is also a big stroke with what may seem like an exaggerated movement.
- 0:42 ro 露 Dewdrop Start the line by applying the brush at a 45 degree angle.
- 0:44 Note the change in the hand position. The brush has been rotated clockwise slightly to bring the thick part of the brush facing the bottom of the page.
- 0:45 To end the stroke, the brush is lifted a bit and reapplied in a very brief pause.
- 0:46 Finally the brush is lifted in an upward stroke (towards the top of the paper) and off of the paper. This motion gives the end of the stroke a dewdrop-like appearance.
- 0:50 Here we start on the second tensetsu. Begin the stroke by applying the brush at a 45 degree angle.
- 0:50 The hand is rotated counterclockwise so the thick part of the brush is facing to the right and slightly upward.
- 0:51 In the corner the brush is not brought straight down. Rather at the end of the horizontal stroke, create a small 45 degree angle stroke and then proceed with the downward stroke.
- 0:52 Note how the hand position is changed to bring the thick end of the brush in line with the direction of the line to be drawn which is down and to the left.
- 0:55 At the end of the line there is no pause and the brush is brought up (towards the top of the paper) and off the paper.
- 0:57 Draw the final yokoga by applying the brush at a 45 degree angle.
- 0:59 This is not a thick line and so while the hand position is for drawing a line to the right, the brush is not tilted over to get maximum contact with the brush to the paper. Line thickness should be regulated in this manner and not by simply applying downward pressure to the brush.
- 1:03 There is nice balance here. This is a solid character.
2. How students did
A student’s 岩
The student’s video, without corrections
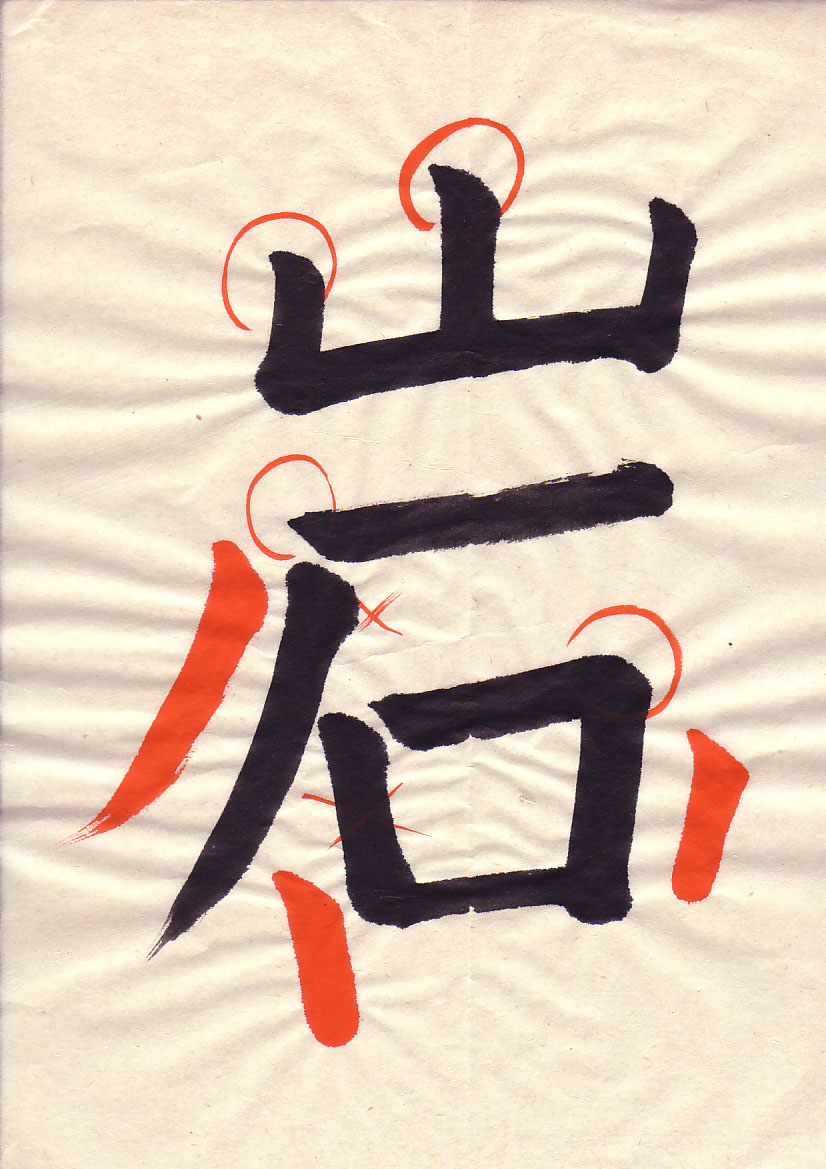
- 0:06 The starts of these two tatega are fine.
- 0:10 The yokoga starts fine. There is too much white space between this line and the top horizontal line.
- 0:10 The hidaribarai does not have a good start.
- 0:12 Apply the brush at a 45 degree angle.
- 0:14 The brush has been rotated slightly clockwise in the direction of the line to be drawn which is down and to the left. Note that the brush is tilted dramatically to get good contact with the fattest part of the brush on the paper.
- 0:15 The brush is brought up and off the paper giving a nice sword shape to the end of the line.
- 0:21 The ro stroke does not have a nice start. Apply the brush at a 45 degree angle.
- 0:23 Press down gently on the brush and come back up a little. The brush is then rotated clockwise so the thick part of the curve of the brush is facing downward. The brush is also tilted so the tip of the brush is well below (towards the bottom of the page) the end of the brush.
- 0:25 To end the stroke, the brush is lifted a bit and reapplied very briefly. Finally the brush is lifted in an upward stroke (towards the top of the paper) and off of the paper.
- 0:32 The angle in the corner is not bad. The bleeding of the ink gives a curve here, but this is fixed by thickening the ink - the stroke is fine.
- 0:37 The end of the tensetsu should not have this rounded look. To end the stroke, the brush is lifted a bit and reapplied very briefly. Finally the brush is lifted in an upward stroke (towards the top of the paper) and off of the paper.
- 0:38 While the form of the character is not good, this should not be our focus at this point. Concentrate on getting the strokes just right. Once the strokes are done nicely then we can begin to concentrate on the form.
Another student’s 岩
The student’s video, without corrections
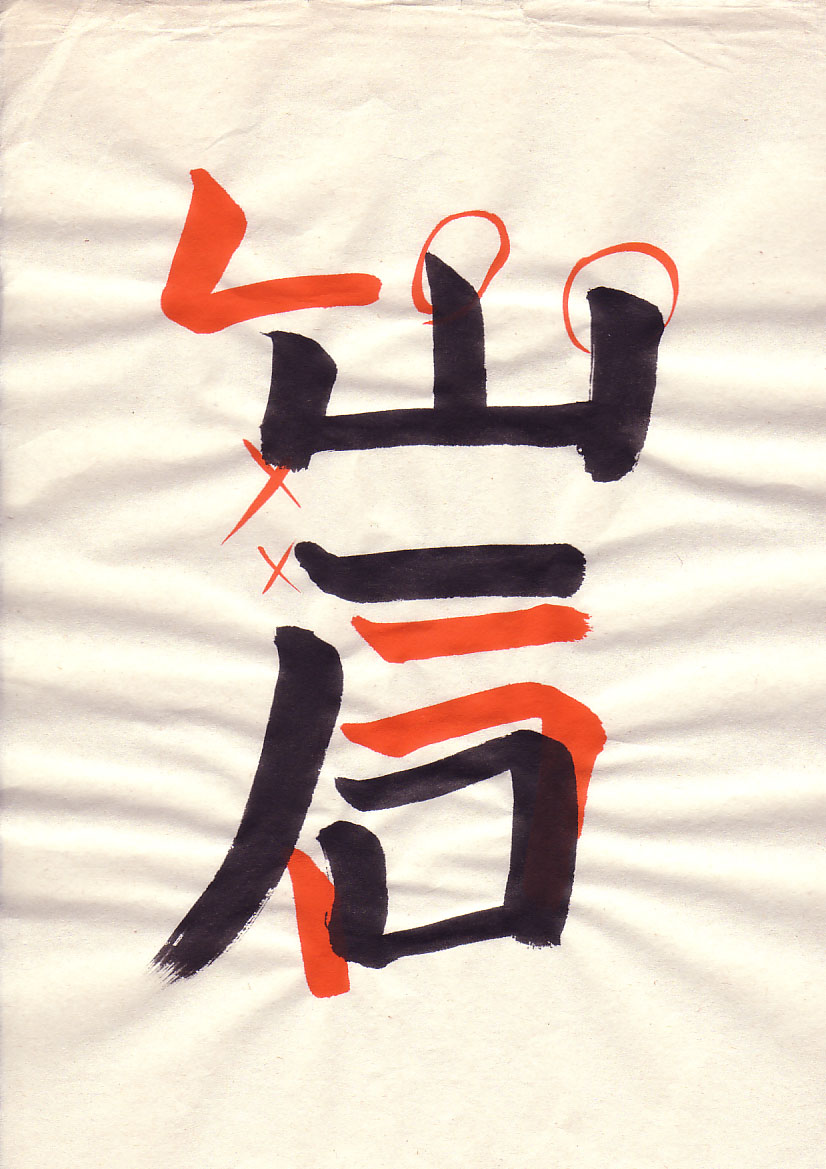
- 0:03 The ro stroke is fine.
- 0:05 The tensetsu was done wrong. The student drew the vertical line, then brought the brush up and then to the right. The result is not pleasing.
- 0:07 Begin the stroke by applying the brush at a 45 degree angle.
- 0:08 The hand is then rotated so that the thick part of the brush faces down towards the bottom of the page. Also notice the brush is tilted so that the thick part of the brush has good contact with the paper.
- 0:10 The line is not straight down but rather is slanted slightly to the left.
- 0:11 At the end of the vertical component, create a small 45 degree angle stroke down and to the right. Then the brush is repositioned so the thick part is towards the right and slightly up.
- 0:14 Note the difference in the shape of the corner of the tensetsu. The student version looks like there are two lines while the sensei version has a nice crisp 45 degree angle corner.
- 0:16 The student attempted applying the brush at a 45 degree angle which is fine.
- 0:19 For the yokoga the student drew too much of a 45 degree angle line. The start has a curve which it should not.
- 0:19 Apply the brush at a 45 degree angle. Then push down slightly on the brush.
- 0:21 Rotate the brush so the thick part of the brush is in the direction of the line to be drawn which is to the right and slanted slightly upward.
- 0:25 Note the crisp start of the line and the nice ending.
- 0:35 The ro line is not well done.
- 0:39 Note the curve at the start of the student's tensetsu. The line also properly angles upward, but there is a curve to it which should not be there.
- 0:40 Position the brush so the thick part of the brush is to the right and slanted slightly upward. Also the brush is positioned so that the tip of the brush is well to the right of the end of the brush.
- 0:41 Use the arm to apply constant pressure to give a straight and even width line.
- 0:42 Reposition the brush to draw a slight 45 degree angle line for the corner.
- 0:45 The brush is repositioned once again so the thick part faces downward and slightly to the left.
- 0:48 Note that the entire "box" is too low.
- 0:48 Student 2 needs to practice the basic lines. Notice there is no confidence in the strokes. The lines are not straight and there is no consistency in the width of the lines.
Vocabulary
| Romaji | Kana | Kanji | English | Audio |
|---|---|---|---|---|
| hidaribarai | ひだりばらい | 左払い | Left Pullout Stroke | audio |
| iwa | いわ | 岩 | Rock | audio |
| ro | ろ | 露 | Dewdrop Vertical Line | audio |
| tatega | たてが | 縦画 | Vertical Stroke | audio |
| tensetsu | てんせつ | 転折 | Continued Lines | audio |
| yokoga | よこが | 横画 | Horizontal Line | audio |