
Lesson 24
喜 ki · Joy
1. The character
喜 means "joy" and is read ki.
This character is also used in the word yorokobi also meaning "joy" which is written 喜び. In this word, the final character び is bi which is a hiragana character. hiragana is the second Japanese syllabary and is used to write verb changes, grammatical elements and Japanese words phonetically. hiragana is unique to Japanese and is a large part of what makes Japanese Calligraphy unique.
We will cover hiragana when we begin the semi-cursive script called gyōsho.
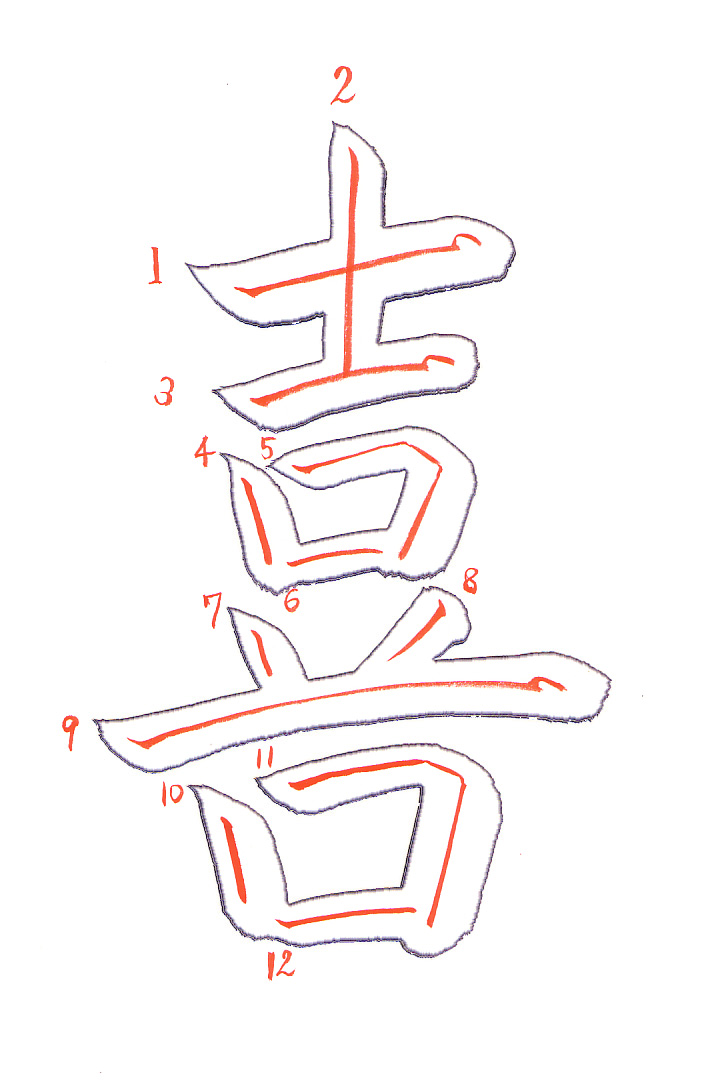
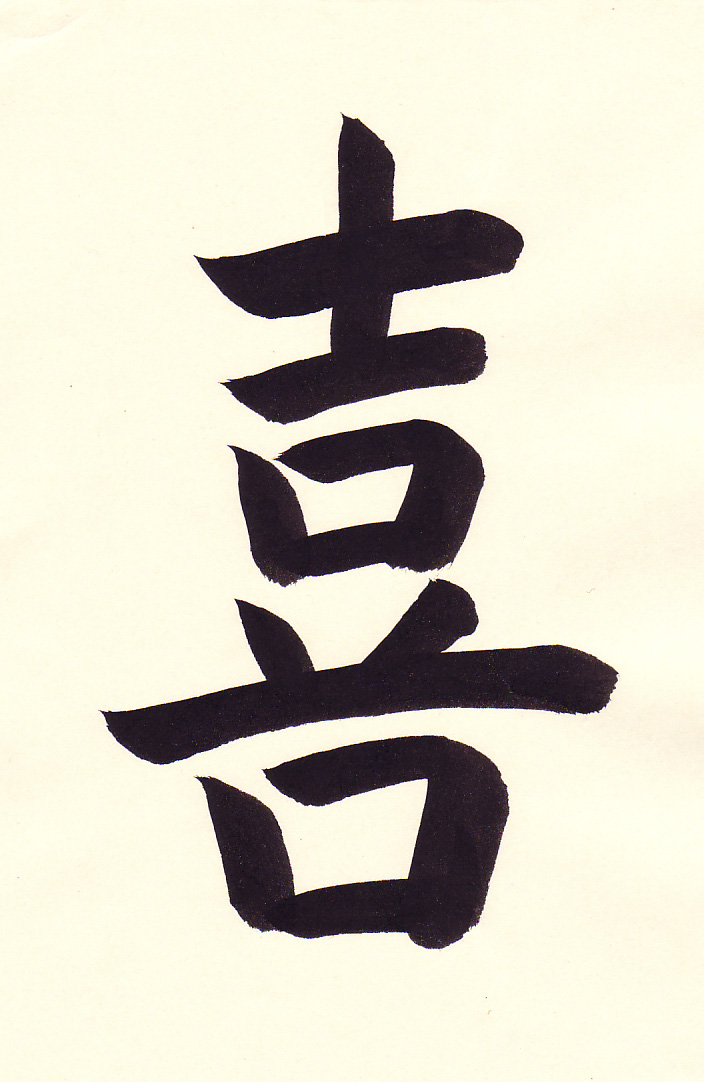
- 0:00 For the yokoga, apply the brush to the paper at a 45 degree angle. Press down gently on the brush and release the pressure. Rotate the brush counterclockwise so the thick part of the brush is facing to the right and slightly upward. The brush is tilted so that the tip of the brush is to the right of the end of the brush.
- 0:02 Push the brush to the right using the whole arm and even pressure.
- 0:03 At the end of the line, raise the brush a bit and then again gently press down on the brush at a slight angle.
- 0:04 Then bring the brush down and around slightly filling out the end of the line.
- 0:06 For the tatega, apply the brush to the paper at a 45 degree angle.
- 0:06 Press down gently on the brush and come back up a little. The brush is then rotated clockwise so the thick part of the curve of the brush is facing downward. The brush is also tilted so the tip of the brush is well below (towards the bottom of the page) the end of the brush.
- 0:08 Then push the brush straight down using your arm to draw the line.
- 0:09 At the end of the line stop and press down gently on the brush.
- 0:09 Finally bring the brush up and off the paper.
- 0:10 The second yokoga is shorter than the first. Apply the brush to the paper at a 45 degree angle.
- 0:11 Press down gently on the brush and release the pressure. Rotate the brush counterclockwise so the thick part of the brush is facing to the right and slightly upward. The brush is tilted so that the tip of the brush is to the right of the end of the brush.
- 0:11 Push the brush to the right using the whole arm with even pressure.
- 0:12 At the end of the line, raise the brush a bit and then again gently press down on the brush at a slight angle.
- 0:12 The end of the line is filled out slightly by bringing the brush down and around.
- 0:13 And then off the page to the left.
- 0:14 The "box" we are about to draw is the same width as the yokoga we just finished. Begin the tatega by applying the brush at a 45 degree angle.
- 0:15 Press down gently on the brush and come back up a little. The brush is then rotated clockwise so the thick part of the curve of the brush is facing downward. The brush is also tilted so the tip of the brush is well below (towards the bottom of the page) the end of the brush.
- 0:16 The arm is used to draw the line and note that it is angled slightly inward to the right.
- 0:16 At the end of the line press down slightly and then bring the brush up and off the paper.
- 0:17 For the tensetsu, apply the brush at a 45 degree angle.
- 0:18 Press down gently on the brush and release the pressure. Rotate the brush counterclockwise so the thick part of the brush is facing to the right and slightly upward. The brush is tilted so that the tip of the brush is to the right of the end of the brush.
- 0:18 At the end of the horizontal component the brush is rotated clockwise so that the thick part of the brush is facing down and to the right.
- 0:19 Draw a short 45 degree angle line.
- 0:20 The brush is then rotated further so the thick part of the brush is facing down and to the left. Draw the vertical component of the tensetsu.
- 0:21 The tensetsu is finished by bringing the brush up and off the paper.
- 0:25 For the ten stroke apply the brush at a 45 degree angle.
- 0:25 Press down gently on the brush and come back up a little. In the direction of the brush draw a line down and to the right. The brush is also tilted so the tip of the brush is well below (towards the bottom of the page) the end of the brush.
- 0:26 At the end of the line press down slightly and then bring the brush up and off the paper.
- 0:27 Begin the hidarihane by applying the brush at a 45 degree angle.
- 0:28 Press down and rotate the brush clockwise so the thick part of the brush is facing down and to the left.
- 0:28 Tilt the brush so the tip of the brush is to the left and down from the end of the brush. Then in a quick motion bring the brush to the left and down as you bring the brush off the paper.
- 0:28 The hane stroke is a quick and large stroke.
- 0:30 Start the fu style yokoga by applying the brush at a 45 degree angle.
- 0:31 Press down gently on the brush and release the pressure. Rotate the brush counterclockwise so the thick part of the brush is facing to the right and slightly upward.
- 0:32 Pressure on the brush is released slightly as one moves towards the middle of the line and reapplied as one moves away from the middle. This gives the line a varied thickness.
- 0:33 At the end of the line the brush is brought up very slightly and pressed down very slightly.
- 0:33 The brush is then brought down and around filling out the end of the line.
- 0:34 Finally the brush finishes the curve to the left.
- 0:34 And the brush is brought up and off the paper to the left.
- 0:36 The final "box" is slightly larger than the previous. Start the tatega by applying the brush at a 45 degree angle.
- 0:37 Press down gently on the brush and come back up a little. The brush is then rotated clockwise so the thick part of the curve of the brush is facing down and to the right. The brush is also tilted so the tip of the brush is well below (towards the bottom of the page) the end of the brush.
- 0:38 At the end of the line press down slightly.
- 0:38 The brush is then brought up and off the paper.
- 0:40 Begin the tensetsu by applying the brush at a 45 degree angle.
- 0:41 Press down gently on the brush and release the pressure. Rotate the brush counterclockwise so the thick part of the brush is facing to the right and slightly upward. The brush is tilted so that the tip of the brush is to the right of the end of the brush.
- 0:42 At the end of the horizontal component the brush is rotated clockwise so that the thick part of the brush is facing down and to the right.
- 0:43 Draw a short 45 degree angle line.
- 0:44 The brush is then rotated further so the thick part of the brush is facing down and to the left. Draw the vertical component of the tensetsu.
- 0:45 The tensetsu is finished by pressing down slightly and bringing the brush up and off the paper.
- 0:49 Draw the final yokoga.
2. How students did
A student’s 喜
The student’s video, without corrections
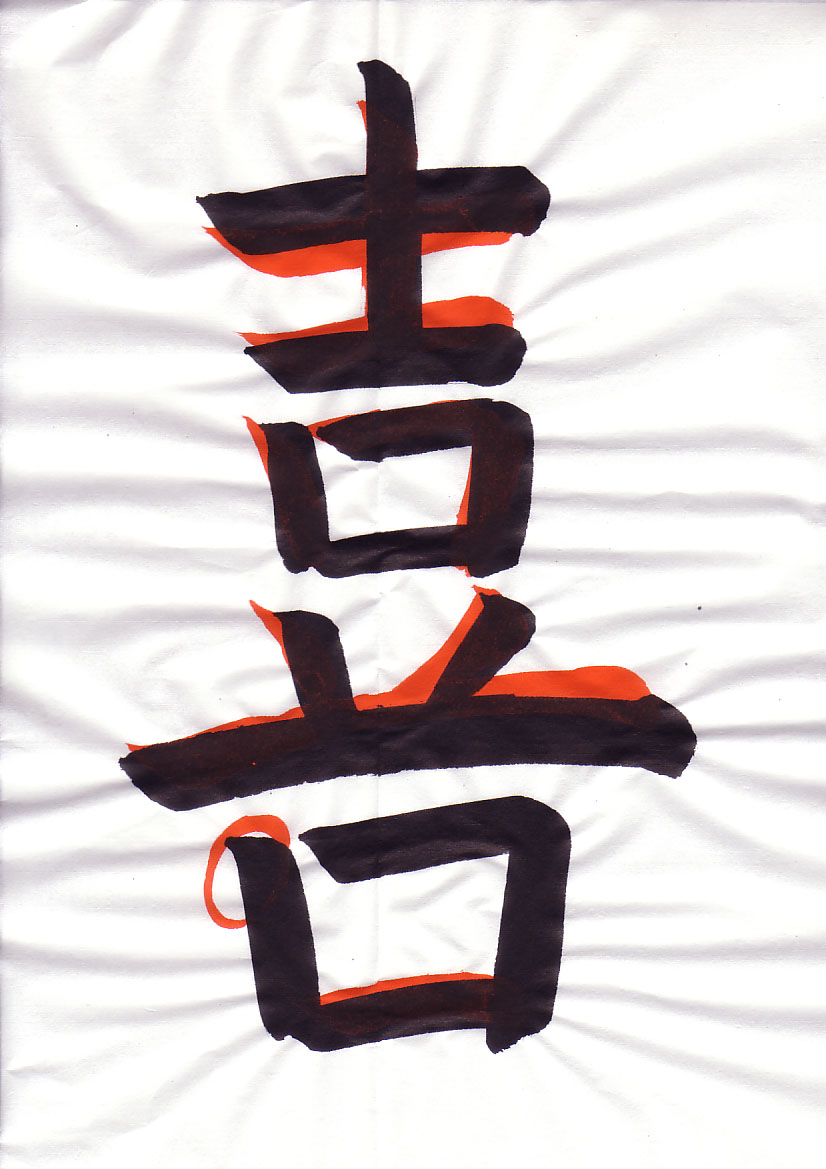
- 0:14 The top part should be tightened up a bit. There is too much space between the two yokoga.
- 0:26 The corner can be nicer and the vertical component of the tensetsu should angle inward more.
- 0:30 The ten needs a better form. To get the top right apply the brush at a 45 degree angle.
- 0:31 Press down gently on the brush and come back up a little.
- 0:31 The brush is then rotated clockwise so the thick part of the curve of the brush is facing downward. The brush is also tilted so the tip of the brush is well below (towards the bottom of the page) the end of the brush.
- 0:32 At the end of the line the brush is brought up and off the paper.
- 0:37 The migihane can have a better shape and should angle more to the left.
- 0:44 The yokoga should curve and angle upward. The width should also vary with the thinnest part in the middle.
- 0:47 The tatega is fine.
- 0:55 The final yokoga needs to be brought up a bit.
Another student’s 喜
The student’s video, without corrections
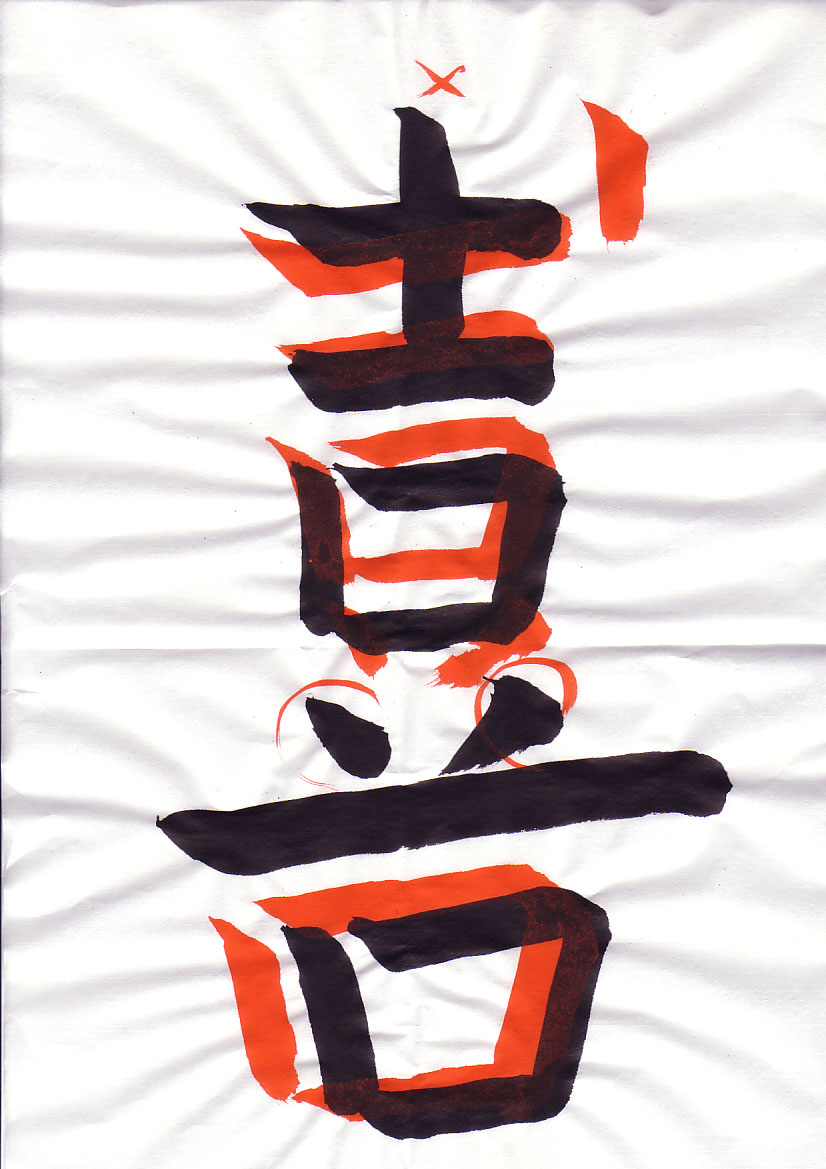
- 0:10 The yokoga should angle slightly upward. The tatega also does not have a nice form.
- 0:13 The second yokoga should also angle upward and the ending should not have the large bump on the bottom.
- 0:25 The "box" should be moved up. The form of the components also needs work.
- 0:29 The ten and the migihane are fine.
- 0:33 This frame shows where the ten and migihane should be positioned.
- 0:39 The form of the lower "box" does not have a nice form. There are several issues including that the end of the tensetsu should protrude slightly downward.
- 0:52 The overall positioning should be closer to the yokoga above.
- 0:52 The main problem here is with the lines themselves. If the lines and strokes are mastered, then the next step is to get a good balance. However, we cannot work on balance unless the lines and strokes themselves are fundamentally strong.
3. End of Section 4: kaisho Basic
This lesson finishes section four. Having practiced 3-4 one hour sessions per week it should have taken you about three months to master these six lessons.
In the next section we are going to delve into katakana. This fifth section will cover the 46 katakana along with the sound changes. katakana is used to write non-Japanese words and names and this will give you a chance to create a katakana version of your name.
Following katakana we are going to continue with the kaisho script but we are going to focus almost entirely on balance and form and introduce a few more strokes and combination strokes that are less commonly used.
For more about the lessons see Takase Shodokai - Learn Japanese Calligraphy.
Vocabulary
| Romaji | Kana | Kanji | English | Audio |
|---|---|---|---|---|
| hiragana | ひらがな | 平仮名 | Cursive Syllabary | audio |
| ki | き | 喜 | Joy | audio |
| tatega | たてが | 縦画 | Vertical Stroke | audio |
| ten | てん | 点 | Dot Stroke | audio |
| tensetsu | てんせつ | 転折 | Continued Lines | audio |
| yokoga | よこが | 横画 | Horizontal Line | audio |